CMS (3)
Content changes, that you make via the Partnershop backend CMS module, must be saved and published, so that they are displayed in the shop. [1][2][3]
The prerequisite for this is that the edited page has the status “Page Is Currently Released” (green) [4] and has been saved. Click the button “Save Changes”. [5]
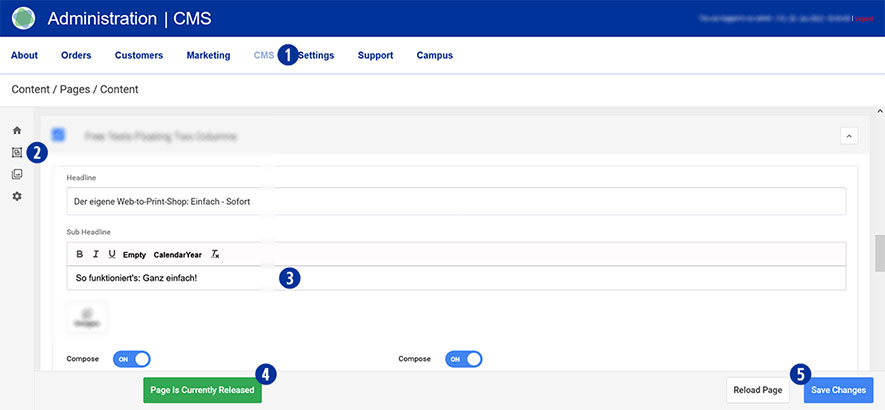
If the “Page Is Currently Released” status is not green, click the button “Page Is Currently Released”.
By clicking on the icon “+”, a new release time is set and confirmed by clicking on the button “Confirm”.
After completing all changes, switch to your Partnershop Backend / CMS / Administration / Redis Management / Exports. [6]
Click the button “Create Productive Version”. [7]
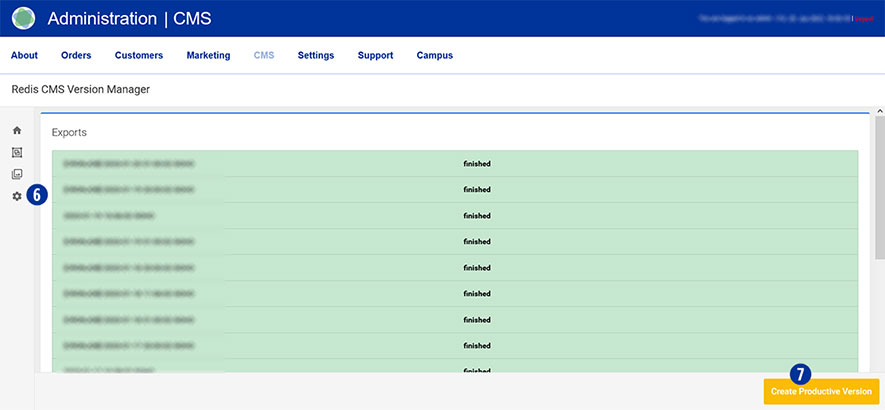
Sequence:
- A new job “new” (marked red) is created under “Exports”.
- Within 60 seconds the new export will start and your job will be displayed as “wip” (highlighted in blue).
- After a successful export, your job will be displayed as “finished” (marked in green).
Your changes are now visible to all customers in the shop.
Yes, you can edit the content of the tiles visible on the home page.
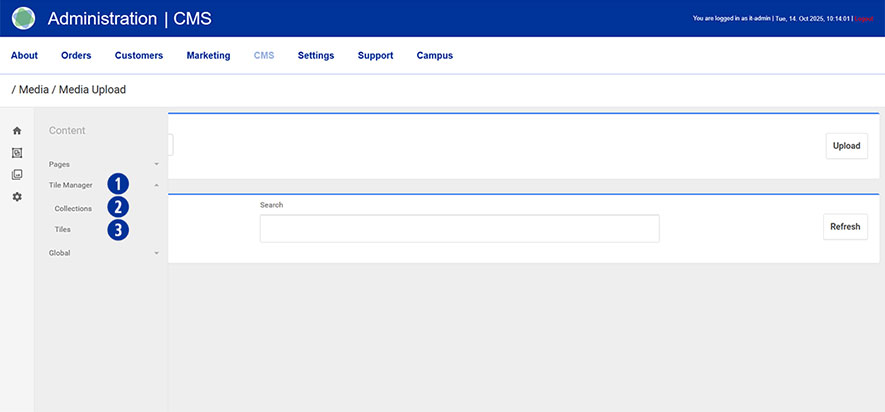
The Tile Manager [1] in the CMS is used to manage and design the tiles on the home page.
You can customise content using the Collections [2] and Tiles [3] tools:
- Collections group and structure multiple tiles into a coherent area.
- Tiles are individual tiles with images, text or links that can be edited and arranged individually.
A tile can be included in several collections.
Each collection and each tile has a collection type.
For editing the tiles on the homepage, the collection type ‘Start Navigation’ is relevant.
In the Partnershop backend, go to Content → Tile Manager → Collections. [4]
Select the collection type ‘Start Navigation’. [5]

You will see the two collections ‘Start Categories’ [6] and ‘Start Topseller’. [7]
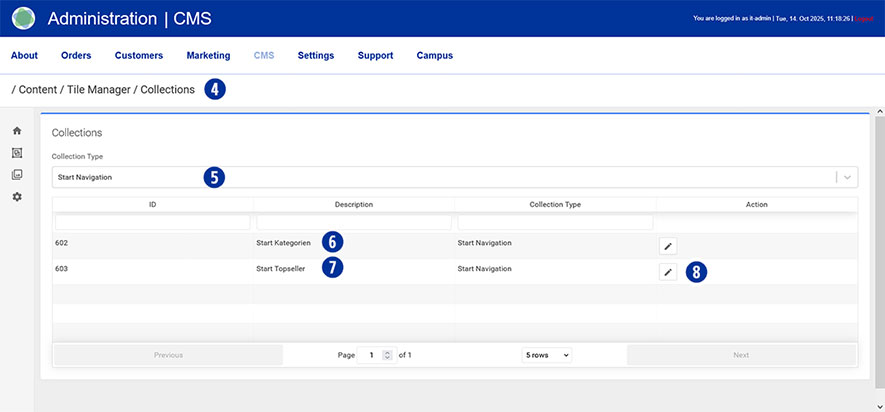
By clicking the edit icon [8] of the desired collection (e.g. ‘Start Topseller’) [7], you will see an overview of the tiles contained in it. [9]
To edit a tile, first select the title of the desired image. [10]

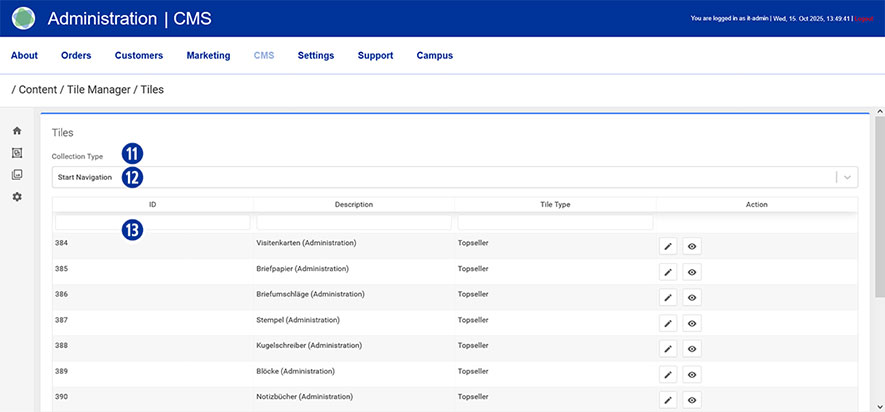
Next, open a new browser tab and navigate in the Partnershop backend to Content → Tile Manager → Tiles. [11]
Again, select the collection type ‘Start Navigation’. [12] In the list displayed below, you will see all tiles available in this collection. [13]
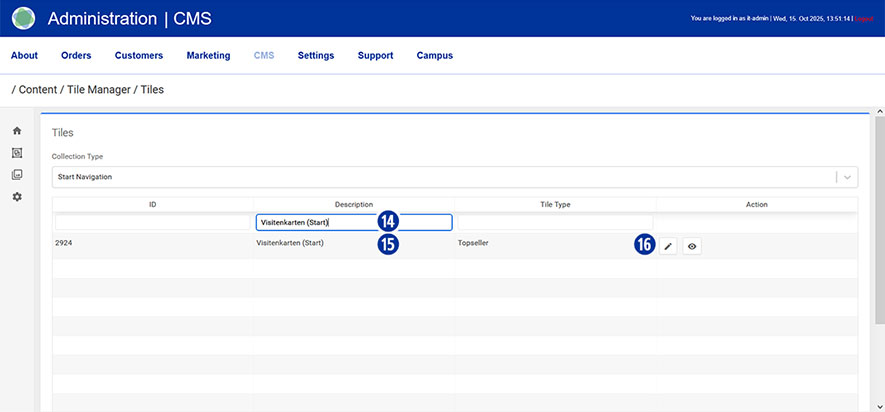
Then paste the tile title you copied to the clipboard into the input field [14] under the column heading ‘Description’.
Make sure that the spelling is correct and that you use the correct upper and lower case letters.
Once you have entered the correct title, the tile selected for editing will be displayed. [15]
Click on the ‘edit icon’ [16] for the selected tile to access the data record for editing.
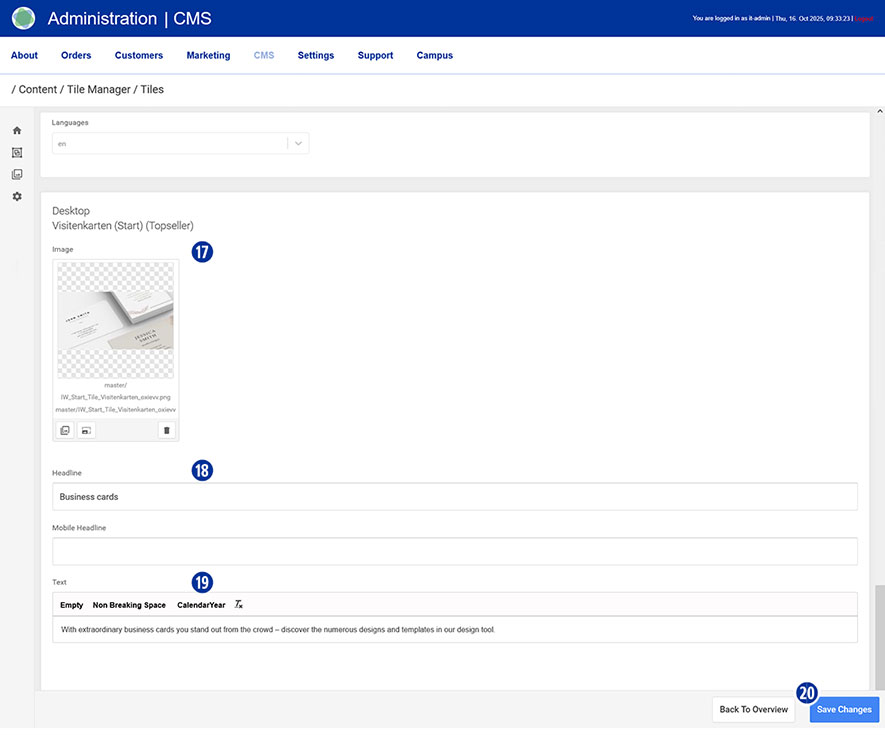
The following content can be customised:
- Image [17]
- Headline [18]
- Text [19]
Confirm your changes by clicking on the ‘Save Changes’ button. [20]
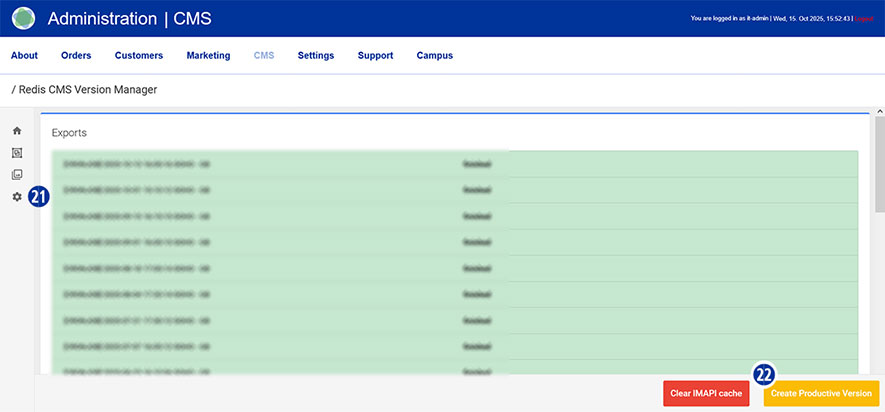
Once you have completed all adjustments, go to CMS → Administration → Redis Management → Exports [21] in the Partnershop backend and click on the ‘Create Productive Version’ button. [22]
Your changes will be visible on the home page of your Partnershop shortly afterwards.
Note
Before images can be exchanged in tiles, they must first be uploaded to the media library via Media → Upload. It is essential to observe the applicable specifications for resolution, file size and spelling to ensure correct display on the home page.
In the Tile Manager, the content for the language specified in the shop can be selected.
In Swiss shops, for example, the languages ‘de’, ‘fr’ and ‘it’ are available.
Please change in your Partnershop backend to Customers. By using different search fields, you have the option to display information about your customer data.
In addition, it is possible to export the customer data from the partner shop backend. The data are stored in a *.CSV file, separated by commas. These data can be imported into a spreadsheet program (e.g. Microsoft Excel).
It is important that the previously generated *.CSV file is not openend but imported.
The following steps must be taken when importing data.
- Start Microsoft Excel and open a new datasheet
- In the menu Data choose the option “From text”
- Choose the saved *.CSV file –> path to the file “customers.csv”
- Push the button “Import”
- Choose the data type –> activate the radio button “Separated”
- Choose the file origin –> „65001 : Unicode (UTF-8)“
- Push the button “Continue”
- Choose the seperator –> activate the checkbox “Comma”
- Push the button “Continue”
- Push the button “Complete”
- Finish the Import to push the button “OK”
As a result, the data is comma-separated and imported into individual columns separately into the previously opened new Excel datasheet.
Finance (25)
Worldline | Six Payment Services is a so-called Payment Service Provider (PSP), through which your customers are offered various online payment methods within the Partnershop. Six Payment Services has contracts and technical connections with the individual online payment services and thus acts as a link between the merchant and the merchant bank.
The operation of a USS Partnershop does not necessarily require registration with Six Payment Services, as your customers do too
Offline payment methods are available (invoice, payment in advance). However, we recommend activating online payment methods. To do this, you need to register with Six Payment Services. This takes place via a separate process.
If you have any questions, please contact the Setup Manager at the following e-mail address: setup@unitedprintshopservices.com
The following online payment methods are currently available to you when you register for Six Payment Services.
- Credit card
- Direct payment (SOFORT)
Saferpay is the payment system from Worldline | Six Payment Services for all online solutions. The cloud-based payment solution ensures the secure payment processing of all orders via your Partnershop. Saferpay enables access to a large number of payment methods and supports all known payment methods, including those from third-party providers such as Klarna.
Credit card payments are made in the partner shop via the provider Worldline | Six Payment Services offered.
First you need to register with Six Payment Services.
If you have any questions, please contact the Setup Manager at the following e-mail address: setup@unitedprintshopservices.com
When the registration with Six Payment Services has been completed, you will receive your activation data and access data for My Saferpay and the Merchant Portal (My Portal) from Six Payment Services by e-mail.
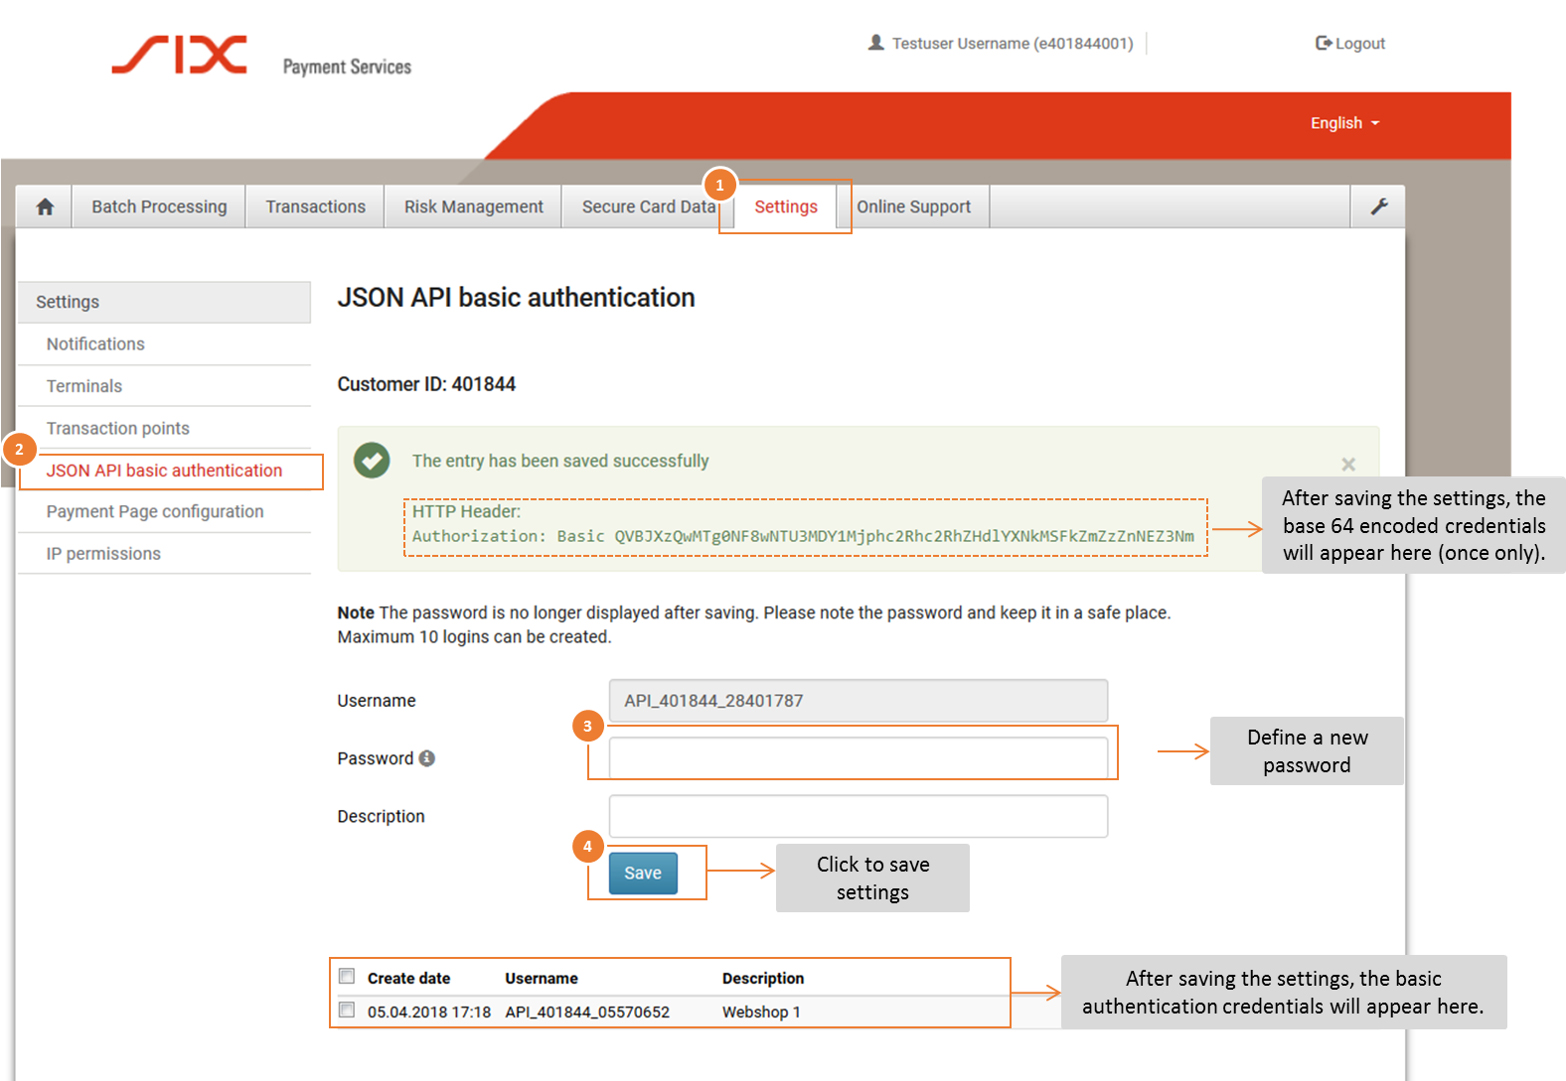
To receive the data required to activate the credit card payment method in your Partnershop, please proceed as follows:
- Log in to the Saferpay Backoffice (My Saferpay) with your Saferpay user name and the corresponding password in order to create the JSON API access data.
- After successfully logging in, navigate to “Settings” (1) and then to “JSON API Basic Authentication” (2).
- Define your API password (3). Click the “Save” button (4) to save your entries.
Activation in the Partnershop backend
Open your Partnershop backend in the Finance > Payment area and enter the required data in the “Indicate your Worldline business account” module.
- API username: This is the username which is displayed in My Saferpay > Settings> JSON API Basic Authentication, e.g. API_401844_28401787
- API password: This is the password that you have defined in My Saferpay.
- Customer ID: The CustomerID is a 6-digit sequence of numbers and is displayed in My Saferpay > Settings > JSON API Basic Authentication. It is also part of the username API, e.g. 401844
- Terminal ID: You can find the Terminal ID (for e-commerce transactions) on the one hand in My Saferpay > Settings > Terminals and on the other hand in the activation data sent to you by SIX Payment Service by e-mail. The Terminal ID usually has the format 17xxxxxx.
Confirm the entries in the Partnershop backend with the button “Go” .
You can then activate the “Activate Payment by credit card” checkbox in the “Activate payment methods” module on the same page (Finance > Payment) and confirm here with “Go”.
The payment method is then available to customers in the shopping cart.
SOFORT is a payment method from the third-party provider Klarna.
The following is required to activate the SOFORT payment method (instant transfer) in your Partnershop.
- Registration as an online provider with Klarna SOFORT
https://www.sofort.com/payment/users/register - A valid account (user name, password) for the Saferpay system
- The availability of at least one active Saferpay terminal
- The creation of a new project for SOFORT
To do this, follow the steps in the documentation.
https://saferpay.github.io/sndbx/sofort.html
Note
We recommend using the Google Chrome browser to display the documentation in your language. You can use the integrated translation function to display the content of the page in your language. The language selection is based on the selected system language of your operating system or browser.
Activation in the Partnershop backend
To activate the online payment method SOFORT (direct payment) in your Partnershop, switch to the Partnershop backend after successfully completing steps 1-4.
Note
If you have not yet saved your Worldline business account in the Partnershop backend, please follow the steps for activation as described under Credit Card.
You can then activate the “Activate Payment by Directpay” checkbox in the “Activate payment methods” module on the same page (Finance > Payment) and confirm here with “Go”.
The payment method is then available to customers in the shopping cart.
The PayPal payment processing does not take place via the Payment Service Provider Worldline | Six Payment Services but directly between you and PayPal.
For you as a Partnershop operator, a PayPal business account is required.
To use the “PayPal” payment method within your partner shop, it is necessary to enter the data from the PayPal business account in the partner shop backend – Payment > Indicate your PayPal business account.
To do this, follow the steps below.
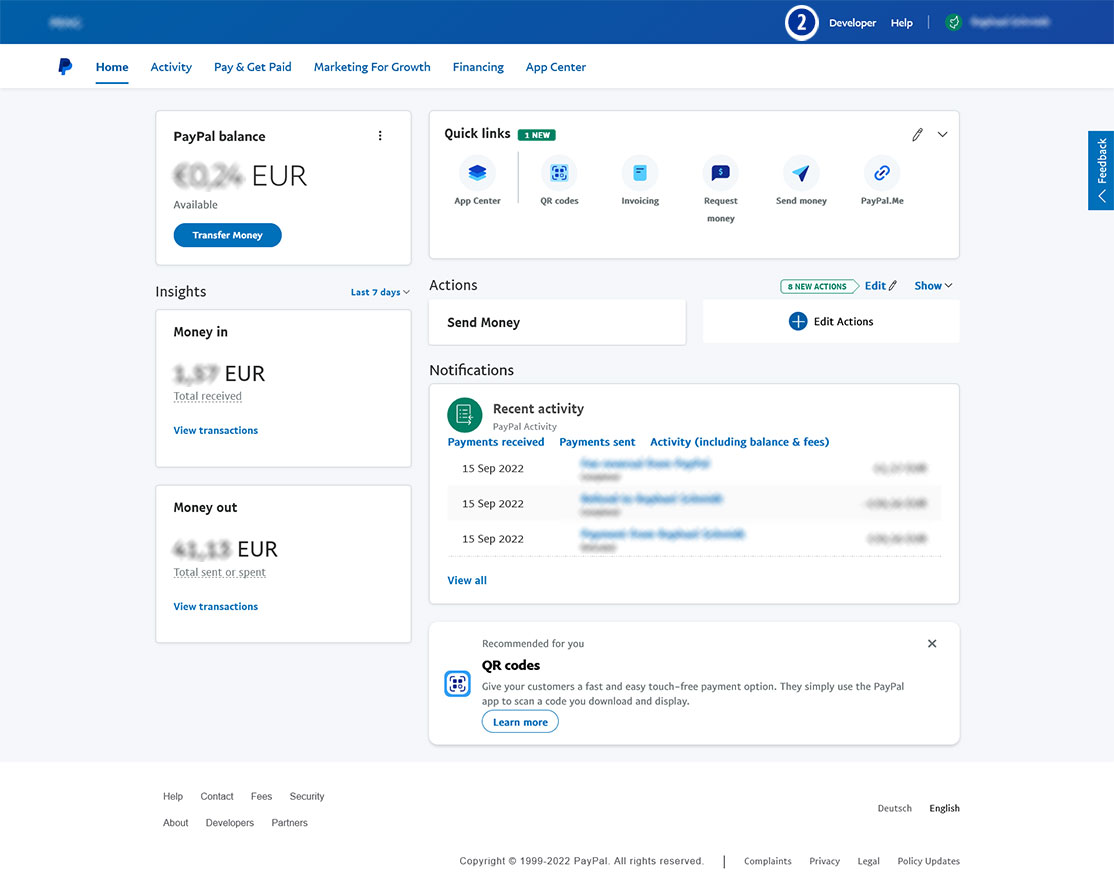
- Sign in to your PayPal account. [1]
Use the URL https://www.paypal.com/mep/dashboard or go directly to the developer settings via https://developer.paypal.com/developer/applications/
- Click the link “Developer” in the main navigation. [2]
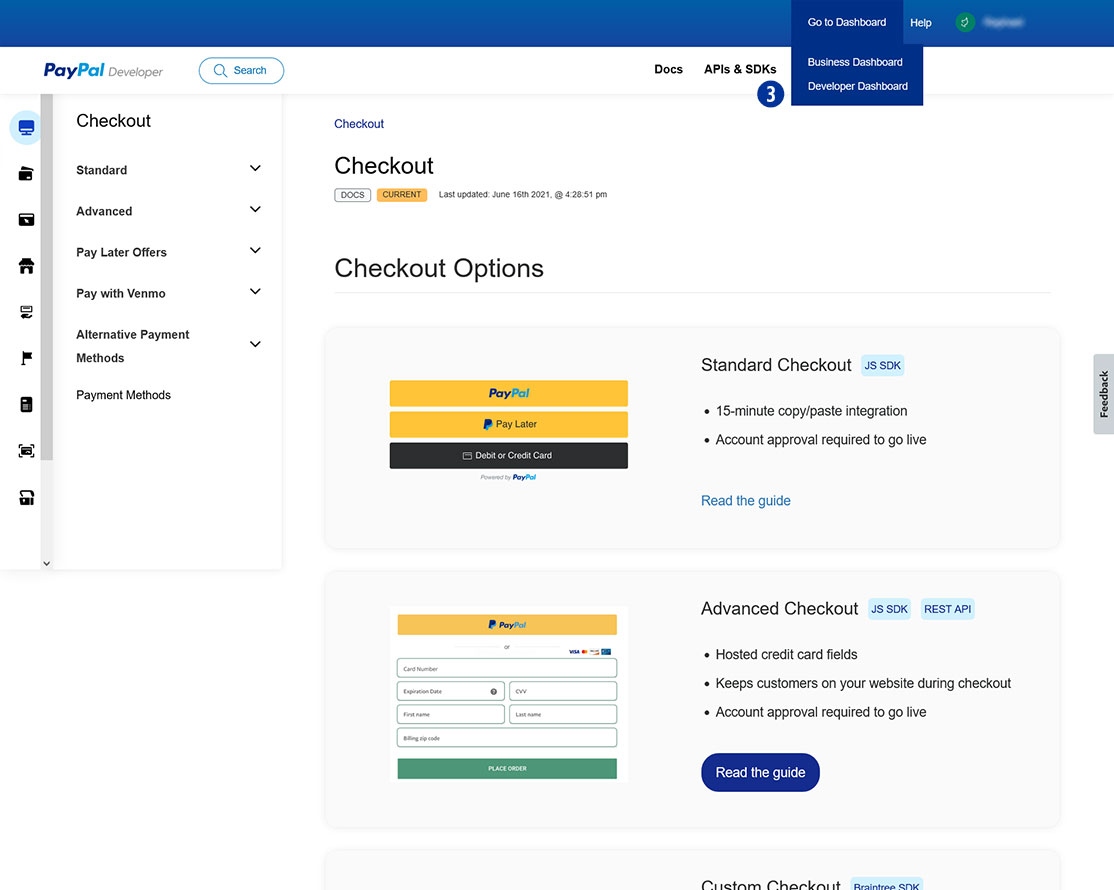
- Click “Go to Dashboard > Developer Dashboard” in the main navigation. [3]
- Select “Dashboard > My Apps & Credentials”. [4]
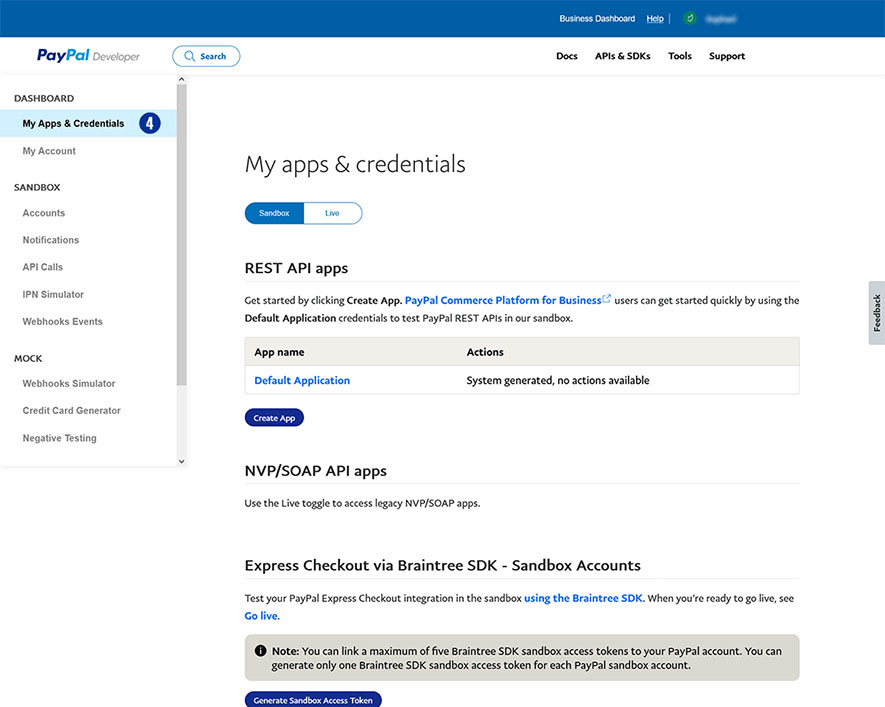
- Click the button “Live”. [5]
- Choose your shop name at “App name”. [6]
If there is no shop name yet, click “Create App” and assign an app for your Partnershop (e.g. brand name). [7]
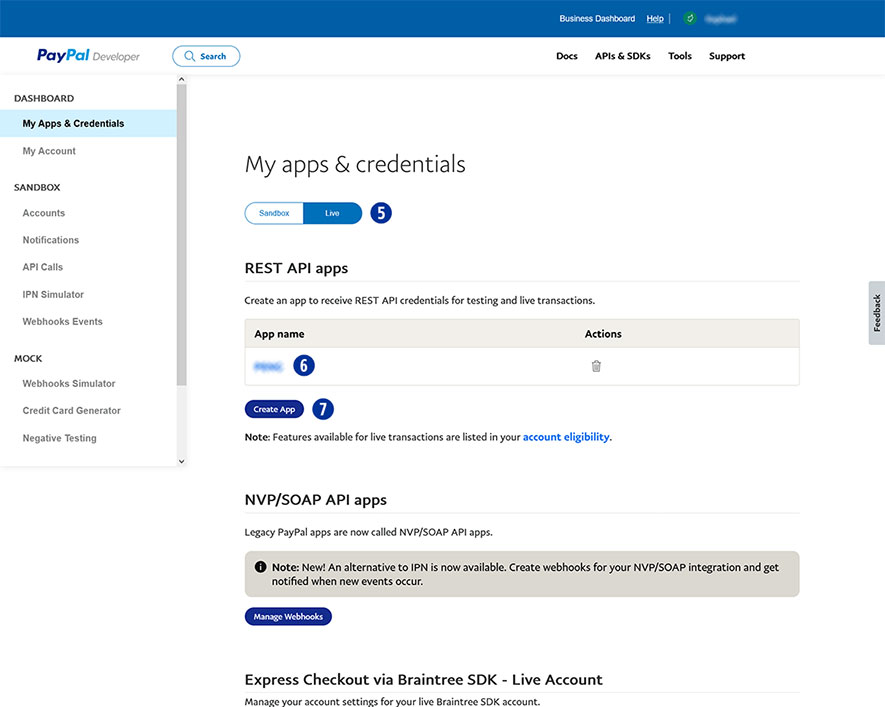
- Copy the “Client ID” [8] and paste it in the Partnershop Backend – Payment > Indicate your PayPal business account. [9]
- In the PayPal account under “Secret” click the link “show” [10] to display the secret key.
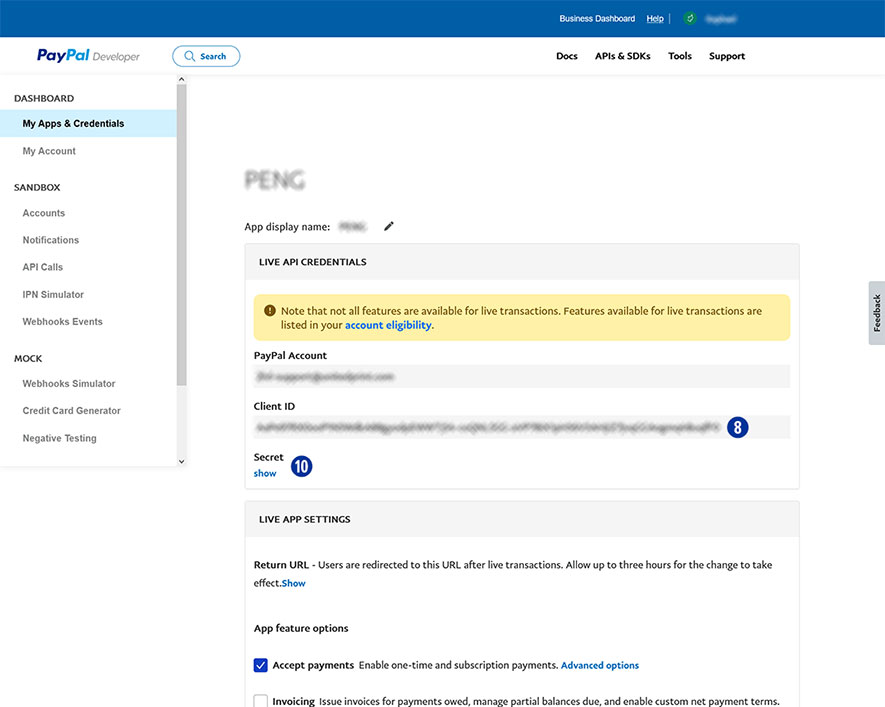
- Copy “Secret” [11] and paste it in the Partnershop Backend – Payment > Indicate your PayPal business account. [9]
- Confirm your entries by clicking the “Go!” button. [12]

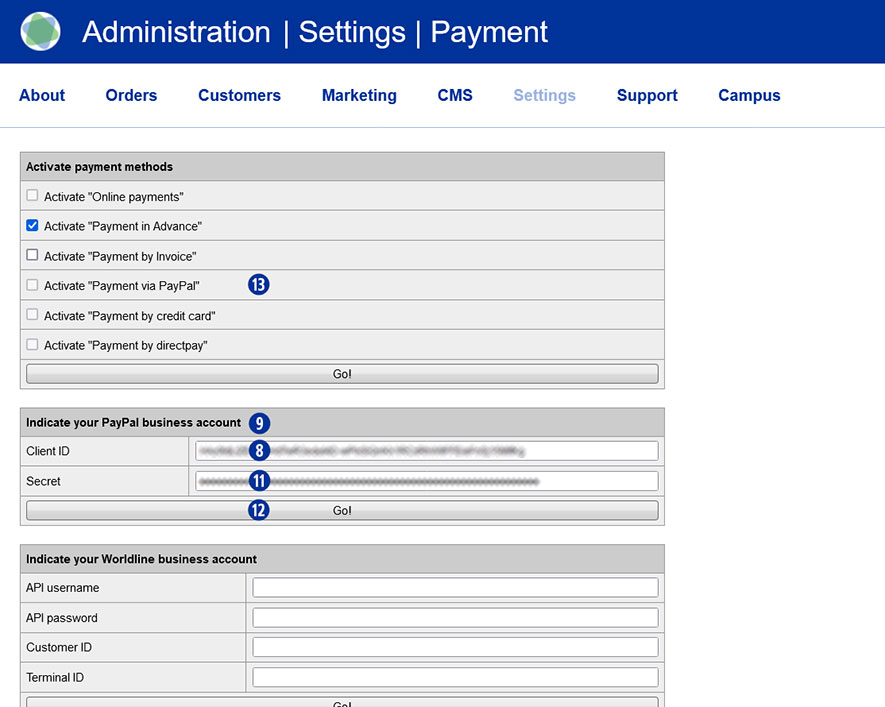
Finally, activate the payment method PayPal in the Partnershop Backend – Payment > Activate “Payment via PayPal” for all customers. [13]
If you cancel an order already transferred to Easyprint, a cancellation fee of 15.00 Euro will be charged. Whether the cancellation fee is due depends on the order status at the time of cancellation.
Note
The manual billing in the Partnershop must take place before the cancellation at Easyprint.
The cancellation fee can be charged by you as a partner to your customer. To do this, a manual invoice must be created via the backend of your Partnershop. Go to the backend section Orders / Track > Payment > Invoice and click the link “Create Invoice with this position”.
In the displayed invoice form, change the invoice item and click the “save” button. Then click the button “back” and then the button “create”. The invoice is generated and a PDF document is created. Choose Open or Save.
To send the invoice by e-mail, first click on the button “track”. This returns you to the order detail view. Then click the link “send”. An e-mail with the invoice PDF attached will be sent to your customer. The delivery status of the e-mail is displayed under the item “Mail tracking”.
The “Cancellation Fee as Damages” of EUR 15.00 collected as a Easyprint Partner is tax-exempt as VAT. 3 para. 2 offset. This means that the invoice to your end customer may not include VAT.
Yes. If your customers orders several items with the same product properties, these items can be shipped collectively. For these positions, your shop will offer a shipment voucher.
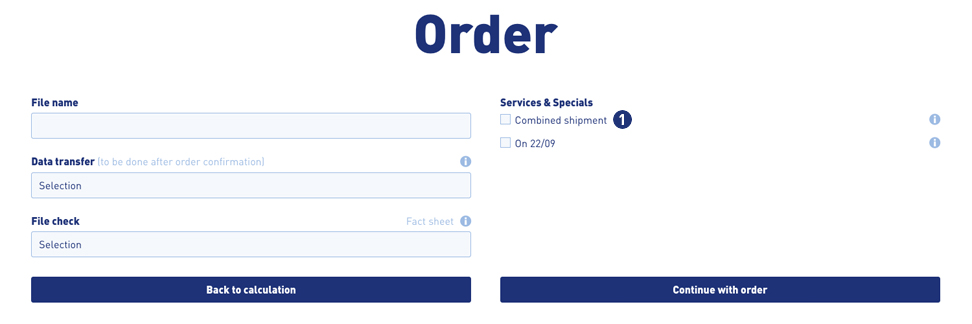
During the ordering process, your customers have the opportunity to select the option “Combined shimpment”. To do this, select the checkbox “Combined shimpment”. [1]
You can use the function “Copy product” in the shopping cart [2] to create several items of the previously configured item (for example, business cards) and to order these with a corresponding dicoount as a collective shipment. The result is displayed in the calculation overview in the shopping cart. [3]
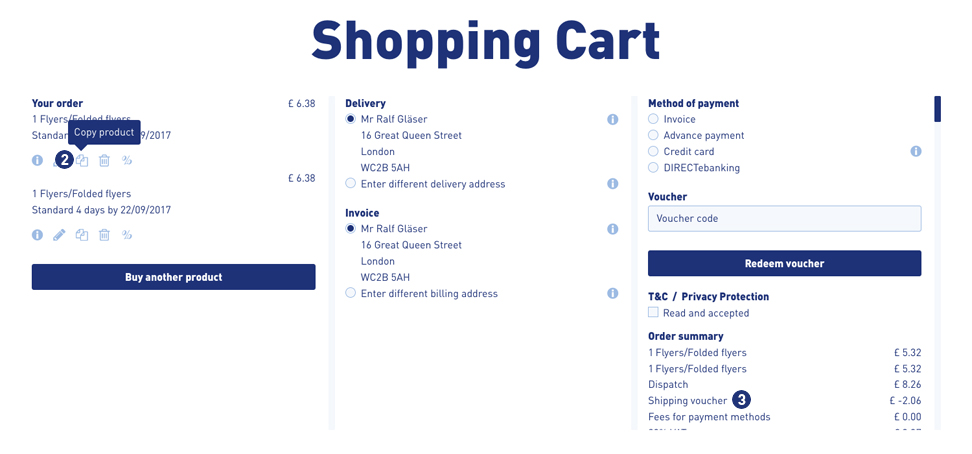
Alternatively, it is possible to configure the same product once or several times over the calculation page and place it in the shopping cart.
Note
An order with the option “combined shipment” is not triggered to production until the print data has been uploaded to all items.
The delivery date changes for the entire order!
If an order from your customer was ordered with the payment method Advance payment or Invoice you must confirm receipt of payment.
To do this, follow the steps below.
Advance payment
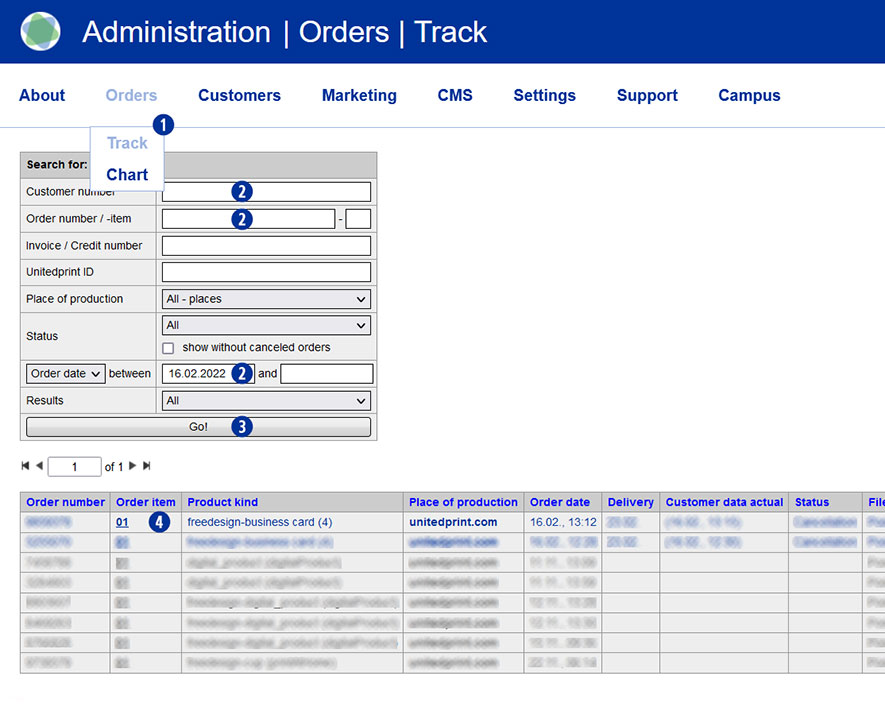
- Switch to the Partnershop backend menu under Orders / Track. [1]
- Select a search criterion [2] and confirm this with the “Go!” button. [3]
- In the search results list, click on the order item in the column “Order item” that is to be confirmed. [4]
The current order status is displayed as “unpaid” in the line “Status of payment” of the Payment module. [5]
- Within the detail view in the module “Payment” / “Payment by”, please activate the checkbox “advance payment”. [6]
- Confirm your selection with the button “Go!”. [7]The order is shown as “paid” in the line “Status of payment”. [8]
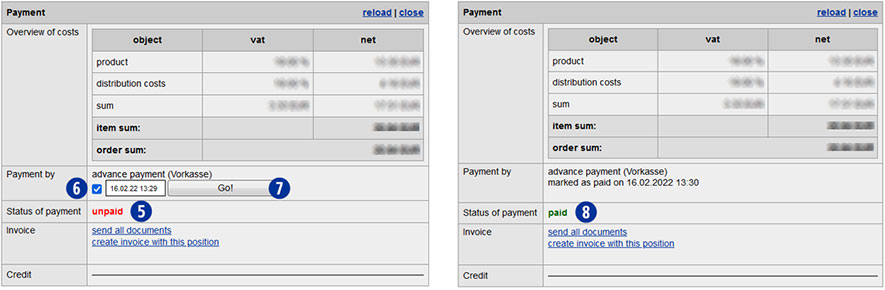
Note
Only after conversion of the status to “paid” an order with Advance payment will be transmitted automatically to Unitedprint.
Invoice
- Switch to the Partnershop backend menu under Orders / Track. [1]
- Select a search criterion [2] and confirm this with the “Go!” button. [3]
- In the search results list, click on the order item in the column “Order item” that is to be confirmed. [4]
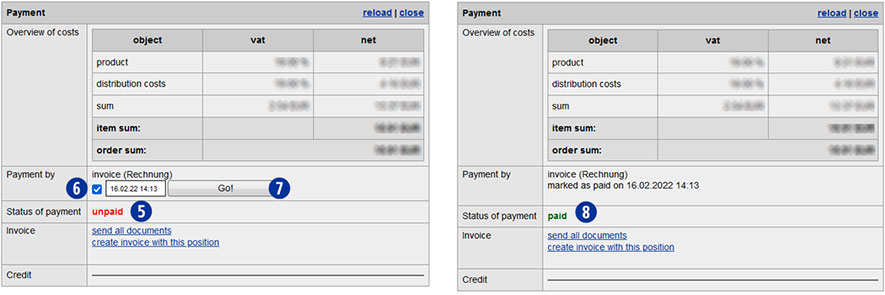
The current order status is displayed as “unpaid” in the line “Status of payment” of the Payment module. [5]
- Within the detail view in the module “Payment” / “Payment by”, please activate the checkbox “Invoice”. [6]
- Confirm your selection with the button “Go!”. [7]The order is shown as “paid” in the line “Status of payment”. [8]
Note
If a PayPal payment is displayed as “unpaid”, please check the payment transactions in your PayPal business account.
Once the payment has been received, confirm receipt of payment there. If no payment has been received, please inform your customer.
Unconfirmed PayPal payments for Partnershop orders are not transmitted to Unitedprint and will therefore also not produced.
Um Ihr PayPal Mandat zu prüfen und zu bestätigen, wechseln Sie bitte auf die PayPal-Seite https://www.paypal.com und melden sich dort mit Ihren Account-Daten an. In Abhängigkeit davon, ob Sie ein Privatkonto oder ein Geschäftkonto nutzen, erfolgen die weiteren Schritte.
Privatkonto
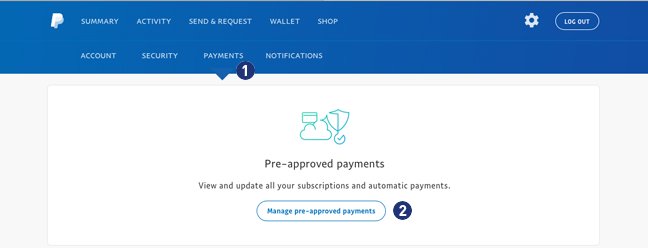
Nach erfolgreichem Login wechseln Sie über das „Zahnrad“ Icon in das Menü „Payments“. [1]
Klicken Sie dort den Button „Manage pre-approved payments“. [2]
 Bestätigen Sie in der Ansicht „Abrechnungsdetails“ Ihr PayPal Mandat für „unitedprint.com SE“. [3] Der Status muss dabei “Aktiv” anzeigen.
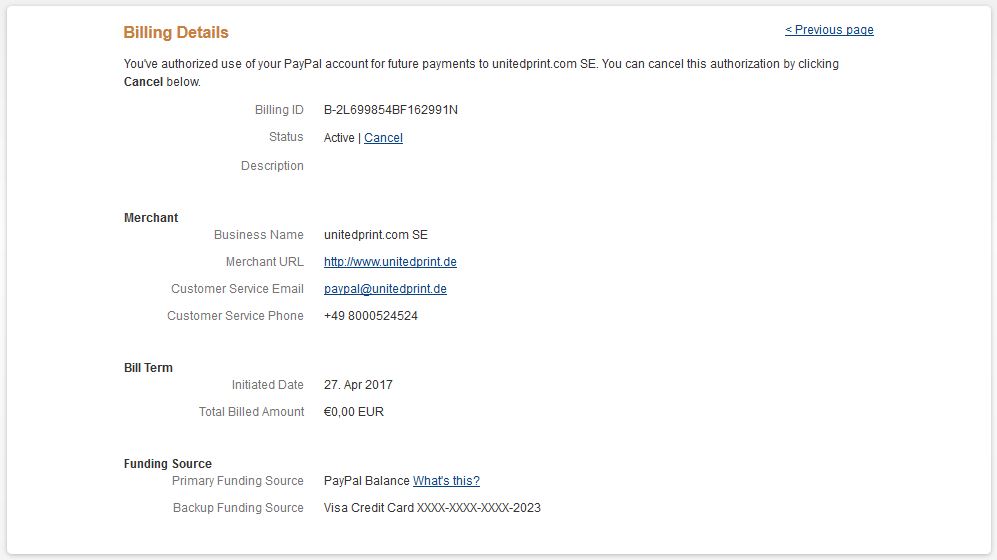
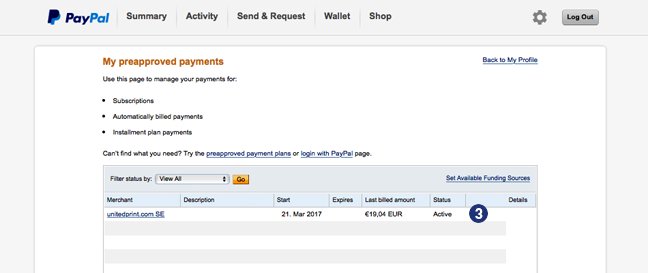 Klicken Sie auf „unitedprint.com SE“ und prüfen Sie in den „Abrechnungsdetails“ ob unter dem Punkt „Zahlungsquelle“ -> „Alternative Zahlungsquelle“ Ihre Kreditkarte (Beispiel VISA-Kreditkarte) eingetrage ist.
Geschäftskonto
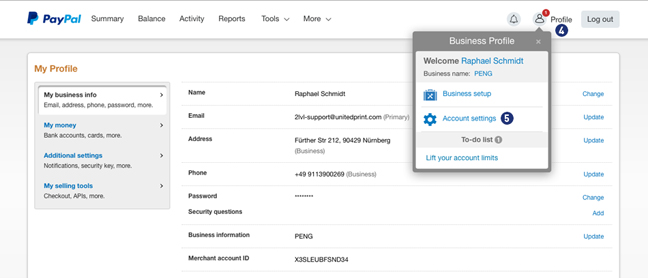
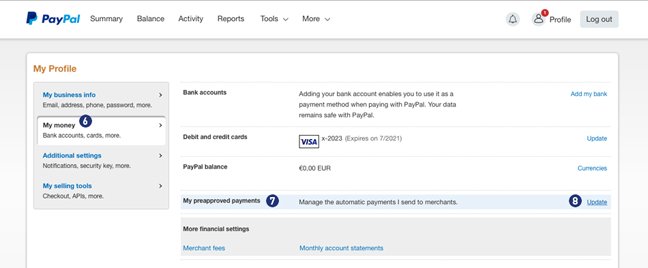
Nach erfolgreichem Login wechseln Sie bitte unter “Profile” [4] > “Account Settings” [5] > “My Money”. [6]
Klicken Sie bei dem Punkt “My preapproved payments” [7] den Link “Update”. [8]
Bestätigen Sie in der Ansicht „Abrechnungsdetails“ Ihr PayPal Mandat für „unitedprint.com SE“. [9] Der Status muss dabei “Aktiv” anzeigen.
Klicken Sie auf „unitedprint.com SE“ und prüfen Sie in den „Abrechnungsdetails“ ob unter dem Punkt „Zahlungsquelle“ -> „Alternative Zahlungsquelle“ Ihre Kreditkarte (Beispiel VISA-Kreditkarte) eingetragen ist.
Hinweis:
Bitte beachten Sie das abweichende Layout sowie die unterschiedliche Navigation in den beiden Bereichen Privatkonto und Geschäftskonto.
The sales summary keeps track of your earnings and expenses at all times.
Use the export function in your Partnershop backend.
In the section Settings / Invoice [1] you will find the module “Search Orderrevenue”. [2]
For a query, select the desired period (month-year) [3], the desired file format (Excel or CSV) [4] and then click on the button “Export”. [5]
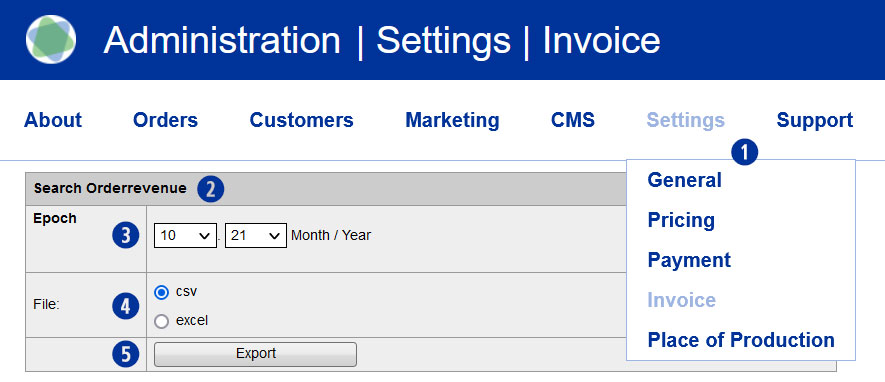
The export file is either directly opened or saved locally with the following name.
Example
Show all sales of my customers in the month of October 2021
- shopbrandname_revenues_21_10.xls
- shopbrandname_revenues_21_10.csv
The generated evaluation contains the following columns/values including a headline.
- Unitedprint Invoice ID
- Unitedprint Invoice Date
- Unitedprint Orderrevenue
- Unitedprint Order ID
- Unitedprint Paymethode
- Shop Invoice ID
- Shop Order ID
- Shop Orderrevenue
- Shop Paymethode
If you only have the corresponding Easyprint order number for a partner shop order, you can find out the corresponding partner shop order via your Partnershop backend.
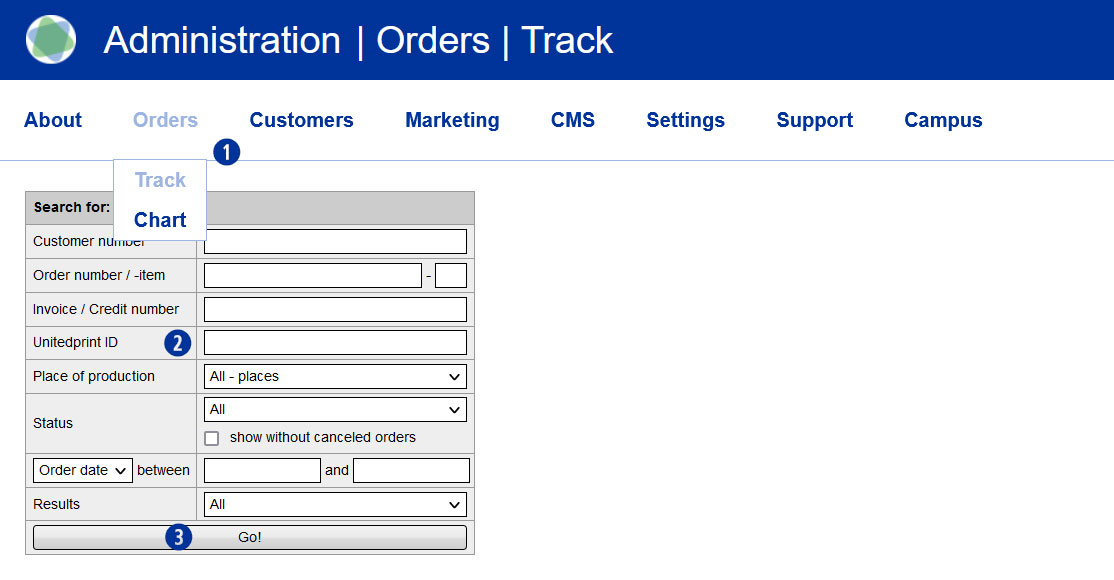
To do this, switch to the Partnershop backend and continue via Orders / Track. [1] In the input field “Unitedprint ID”, enter the Easyprint order number available to you [2] and confirm your entry by clicking the button “Go!” [3]
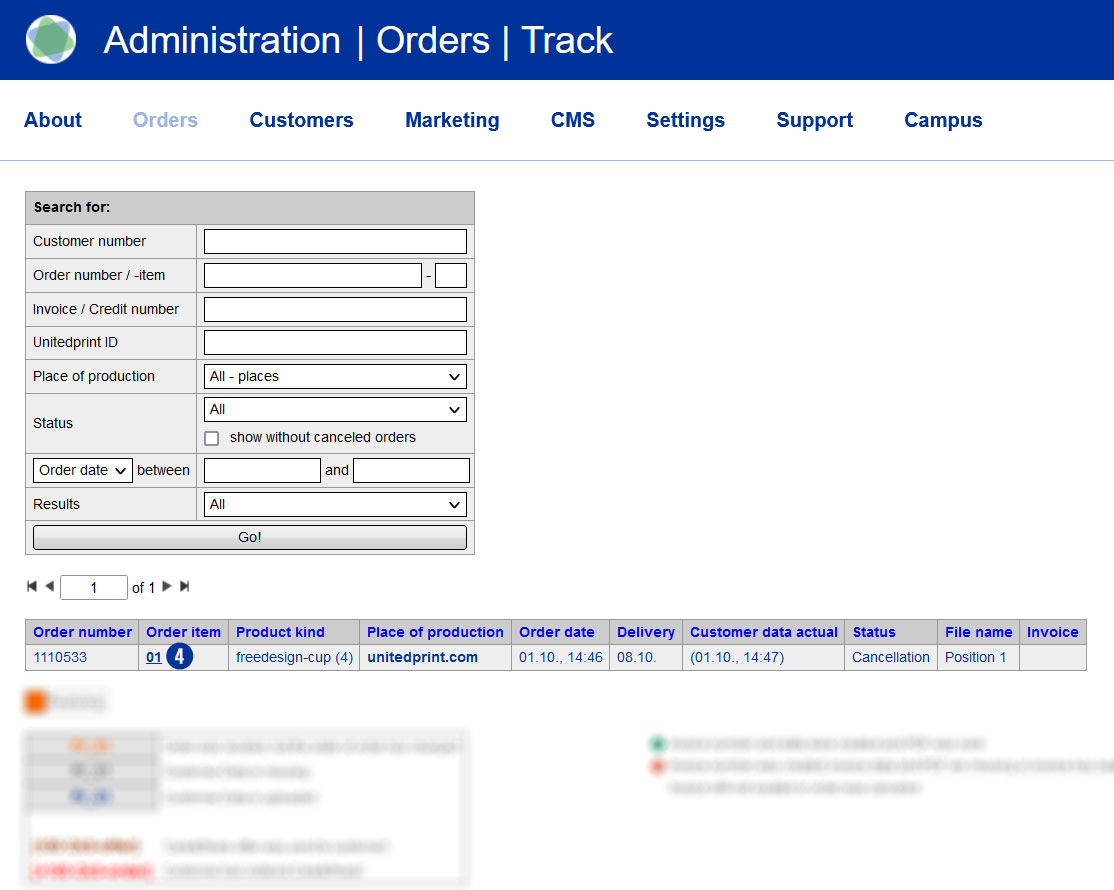
The desired Partnershop order is displayed as a result. For a detailed view of the order, click on the link (s) in the “Order item” column. [4]
An invoice that was already created and sent to your customer can be changed later.
To do this, go to your Partnershop Backend Orders / Track and search for the order related to the invoice. Change to the detailed view and to the module “Payment”.
In the next step, the ordered and sent invoice has to be canceled. To do this, proceed as follows.
how-do-i-create-a-cancellation-invoice/
After successful cancellation, you can create a new invoice manually and send it to your customer manually. To do this, proceed as follows.
how-can-i-create-a-customer-invoice/
Using the edit function (pen) you have the possibility, to change the invoice address, the delivery or invoice date, and so on.n.
The requirement for creation of a customer credit note is that an invoice has been previously generated and sent for the corresponding order.
If an order is invoiced, the “Credit” sub-item is displayed in the “Payment” module of the Partnershop Backend under Orders / Track.
To create a new credit note, click the “new” link. In the opened input form, you select a credit date, store the desired credit amount for net charge, and choose the relevant VAT rate using the selection menu.
Close the credit note by clicking on the “Save & Create” button. Confirm the embedded message. The credit note is generated and a PDF document is created. Choose Open.
To send the credit note by e-mail, click on the “track” button. This returns you to the details of the order. Then click the “send” link. An e-mail with the credit note PDF in the appendix will be sent to your customer. The shipping status of the e-mail is displayed under the item “Mailtracking”.
Note
To check the shipping status “sent” within the mailtracking, you leave the order detail view and call the order again via “Track”. Do not update the job detail view by pressing the F5 key.
Invoicing for the customer takes place automatically. This means that the creation of the invoice is triggered as soon as the purchase order is sent to the customer or the order status changes to “Dispatch”.
If you want to create an invoice manually, please go to the backend area Orders / Track > Payment > Invoice – “Create Invoice with this position”.
Change the delivery date (“edit delivery date”) as well as the invoice date (“edit invoice date”) and click the “save” button. Then click the “back” button and then the “create” button. The invoice is generated and a PDF document is created. Select “open” or “save”.
To send the invoice by e-mail, click on the “track” button. This returns you to the details of the order. Then click the “send” link. An e-mail with the invoice PDF in the appendix will be sent to your customer. The shipping status of the e-mail is displayed under the item “Mailtracking”.
Note
To check the shipping status “sent” within the mailtracking, you leave the order detail view and call the order again via “Track”. Do not update the job detail view by pressing the F5 key.
The creation of a reversal invoice is only necessary (and possible) if the actual invoice has already been created and sent by the system via e-mail to your customer (automatically with the dispatch of the goods).
USS differentiates between the cancellation of an order and the cancellation of the invoice. An order cancellation does not automatically create a cancellation invoice.
If an invoice has already been created and sent and should it be canceled and a cancelation invoice be created and sent, this can be done in the backend area Orders / Track. Locate and select the corresponding job item in “Track”. Scroll to the module “Payment”. There you will see the invoices already sent in the section “Invoice”. Click “Cancel” under the corresponding invoice to cancel this invoice.
Then click the link “send cancelation”. An e-mail with the reversal invoice PDF in the appendix is sent to your customer. The shipping status of the e-mail is displayed under the item “Mailtracking”.
Note
To check the shipping status “sent” within the mailtracking, you leave the order detail view and call the order again via “Track”. Do not update the job detail view by pressing the F5 key.
Your shop offers multiple offline and online payment methods.
Offline payment methods include “payment in advance” and “payment by invoice”. Online payment methods are provided by Six Payment Services. They vary from country to country and – in addition to all usual credit cards – include regional payment methods (e.g. EPS, Ideals, Przelewy24). An activated Six Payment Services account is required in order to offer online payments.
Additionally you are able to pay via PayPal.
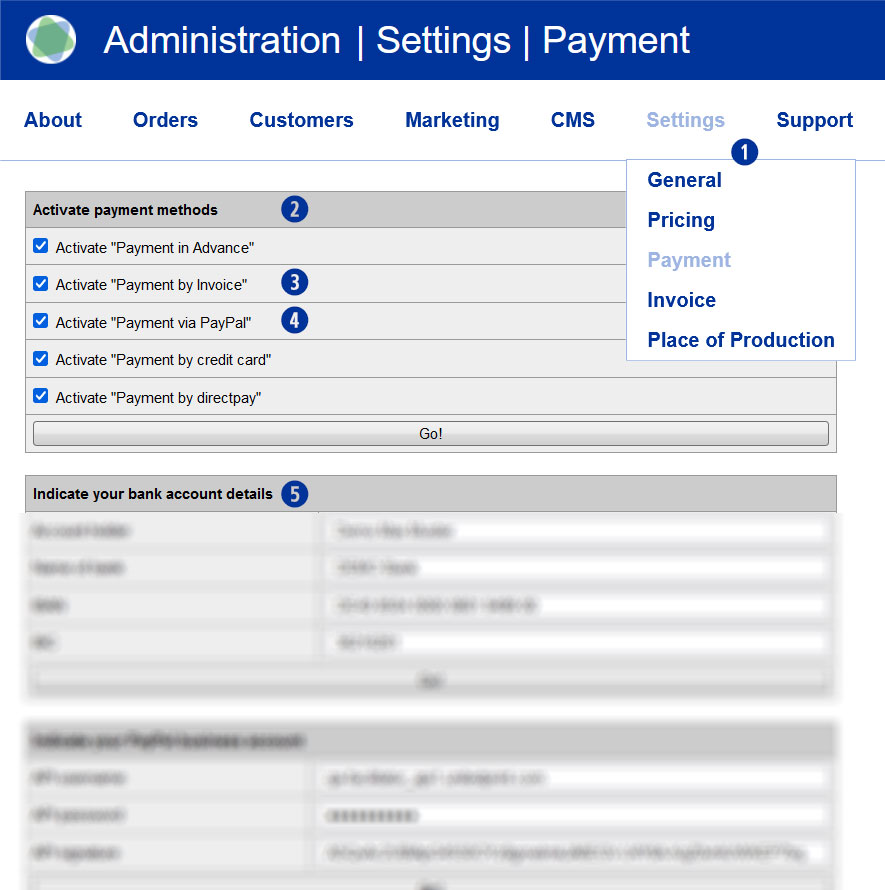
The activation/deactivation of the individual payment methods takes place via the Partnershop backend under the menu item Settings > Payment [1] in the module „Activate payment methods“. [2]

Offline payment transfers need to be managed outside the USS Partner Shop scheme (e.g. via your regular bank account interface).
Note
The offline payment method “payment by invoice” is for safety reasons only to registered users.
You receive offline payments directly from your customers.
Online payments are automatically transferred to your account on a weekly basis. Your margins are the sales prices paid by your customers in your USS Partnershop using the online payment method, less the three possible cost units:
- Unitedprint purchase price
- Unitedprint commission for self-produced shop articles
- Six Payment Services fees for online payments
Yes, in case you allow your customers to chose “payment by invoice” or “payment in advance”, you will receive these payments directly from your customer and without the involvement of Wirecard. Whether this is a bank transfer, a cash payment, or another means of money transfer, is irrelevant for USS.
To do this, activate in your backend under Settings / Payment [1] in the module “Activate payment methods” [2] the setting “Payment in Advance” [3] for purchase in advance and “Payment by Invoice” [4] for purchase by invoice.
Please also enter your account details under “Indicate your bank account details” [5]. These will be shown to your customers when paying in advance in the shop and on the confirmation email.
Please refer to your contract for the fees for using your USS Partnershop.
Costs only accrue when you receive orders. In case an order is produced by Unitedprint, you will be charged the listed price (minus your personal discount). When you are producing the order yourself, you will be charged a commission fee.
The Payment Service Provider Wirecard will charge fees in case your customers chose to use online payment methods. Wirecard’s terms can be viewed at any time in your Wirecard backend.
Note
Non-EURO accounts (for example, CHF, GBP, etc.) may result in differential amounts within Wirecard settlements. These are customary foreign bank fees. As a payment provider, Wirecard has no influence whatsoever.
In order to keep this amount as small as possible, Wirecard can for you as a Partner can switch the payout period from weekly to monthly.
Another option would be to create a EURO account and pay out in EUR.
Payment between Unitedprint and you as a partner is made primarily via PayPal. In agreement with our finance department, an invoice payment may also be possible.
You must pay this invoice within the specified payment term. Fees for the use of online payment methods are billed directly by Wirecard.
Please, inform within 15 minutes after completion of order our support team Phone (020-34 99 03 68) / support@easyprint.co.uk.
Otherwise, your trial order needs to be paid. Additionally please cancel your trial order directly into your Partner backend.
For callback please hold ready the United Print ID of each order.
The invoice template is similiar to your company’s official letterhead. Dynamic invoice information (such as the item list, prices, VAT, customers’ address) will automatically be added to the document, which will then be sent to your customers.
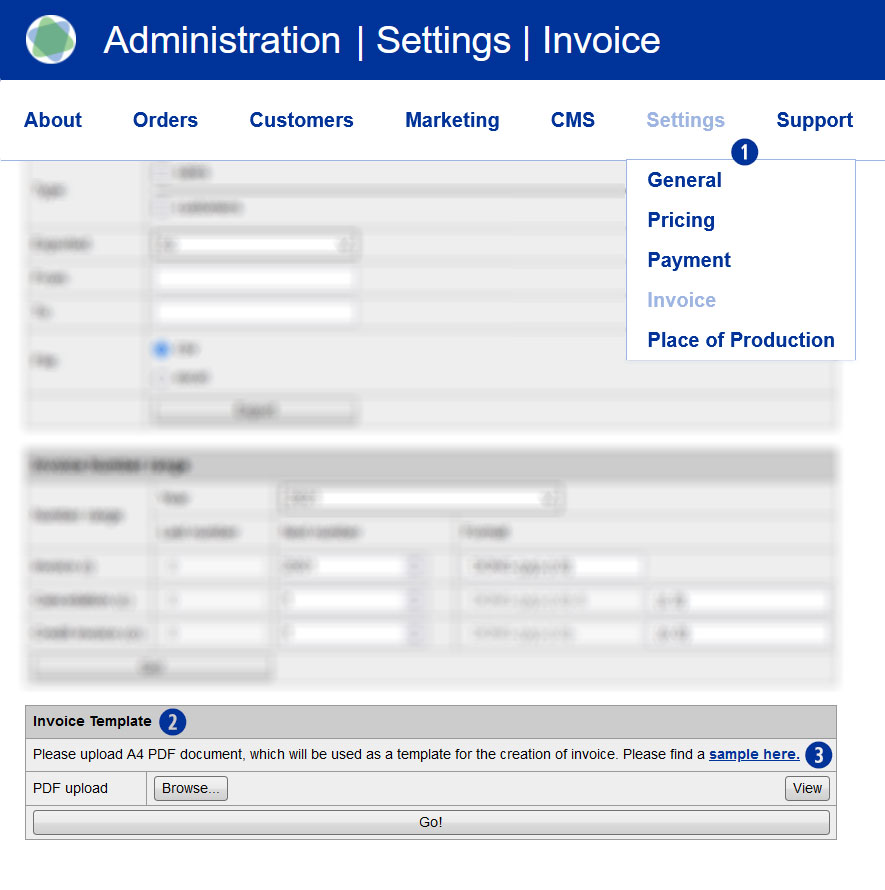
Upload the invoice template in PDF format into your Partnershop backend. For doing so, go to the backend section Settings / Invoice [1], further to the module “Invoice Template” [2] and click the button “Browse” [4] and select the previously prepared invoice template. Confirm the upload by clicking the button “GO!” [5]
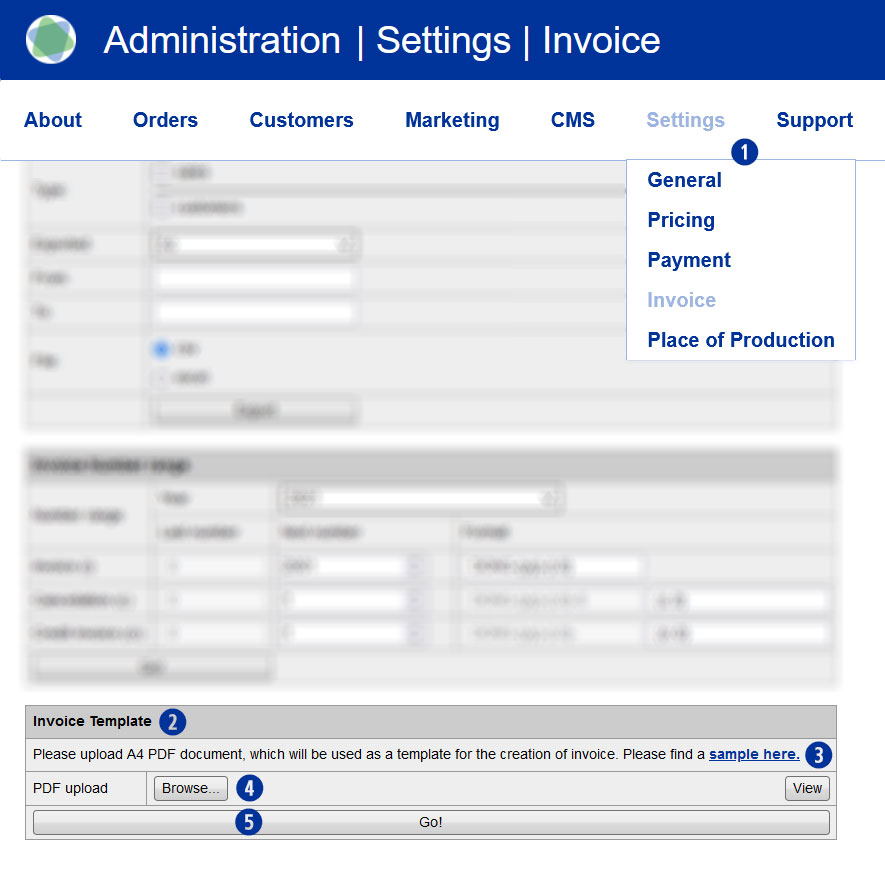
This document then serves as a template for your invoices. An example of how such an invoice template is structured is available for using the download link “sample here” [3].

In order to generate invoices using your corporate design and official company information, your USS partner shop requires a corresponding template. You can generate such a template within just a few minutes. For general guidlines for the placement of your template’s content, please use the sample file provided.
Go into the backend section Settings / Invoice. [1] In the module “Invoice template” [2] you’ll find a link „sample here“ [3] with our sample PDF file. Download the sample file and overwrite it with you componay’s information. Alternatively, you can of course generate such an invoice template yourself.
Note
When designing your own invoice template, please do not place text patterns or images in areas that are left white in the sample template. These areas (especially in the center and the top of the page are need for dynamic invoice information. Save the invoice document in PDF version 1.4 (Acrobat 5.x).
The version check can be carried out with the PDF document open in the Adobe Reader or Adobe Acrobat Pro program over the menu “File / Properties”.
General (7)
In order for your domain addresses to be able to call up the Partnershop, the following DNS settings are required at your domain provider.
| Domain | Typ | DNS-Eintrag |
| mydomain.com | ANAME | designer.mydomain.com |
| www.mydomain.com |
CNAME | designer.mydomain.com |
| designer.mydomain.com | CNAME | elb.unitedprintshopservices.com |
| meinedomain.de | TXT/SPF | v=spf1 include:sendamail24.com |
Optional Subdomain (example: www)
| Domain | Typ | DNS-Eintrag |
| mydomain.com | A | IP: XXX.XXX.XXX.XXX |
Using of more than two addresses (domain+subdomain) or two subdomains is not intended.
Note
It is strongly recommended to choose a provider that supports ANAME records.
If your provider does not have the option of using ANAME or ALIAS entries, an IP address can be assigned for this exceptional case.
Please contact our support via e-mail 2lvl-support@unitedprint.com.
Using an IP address to call up thePartnershop is only possible temporarily and with reservations.
Yes. Log in to the Partnershop backend with the login data sent to you.
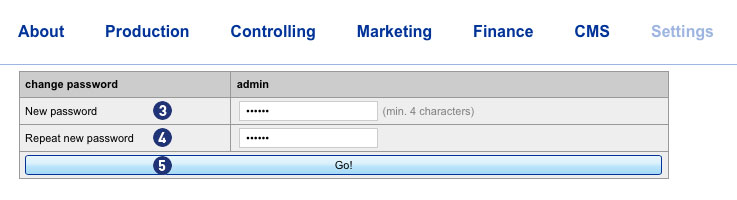
Then change in the menu Settings [1] to the module “change password”. [2]
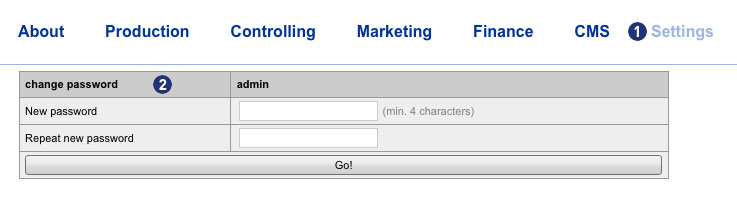 Enter your new password in the input field “New password” [3]. Repeat your entry in the field “Repeat new password”. [4]
Confirm your entry by clicking on the button “Go!”. [5]
 The next backend login is then only possible with the new password.
Note
The new password must be at least 4 characters long.
The entered password and its repetition must not be different.
Please, inform within 15 minutes after completion of order our support team Phone (020-34 99 03 68) / support@easyprint.co.uk.
Otherwise, your trial order needs to be paid. Additionally please cancel your trial order directly into your Partner backend.
For callback please hold ready the United Print ID of each order.
For the Partnershop you do not need a web space (space for files on a Webserver) at your provider. Your entire shop is installed on the USS servers. A separate installation with you or your provider is not necessary.
If you want to use your Partnershop under your own domain you need two domains / subdomains.
You may, if not yet available, reserve through a Internet provider.
Examples
shop.mydomain.(de) – Subdomain of the Shop
Yes. Scheduled to be held every Wednesday from 08:00 until 12:00 o’clock maintenance on your Partnershop instead.
In this period, your Partnershop backend is not available for about 5-10 minutes.
Please note that you do not make any changes during this time via the Partnershop backend.
Welcome at Unitedprint Shop Services!
When you receive your USS Partner Shop, it is already live, meaning that customers can already place orders, which will be forwarded to Unitedprint for production.
However: To fully customize your USS Partner Shop, please follow these 5 last steps:
- Upload an invoice template in PDF-Version 1.4 (Acrobat 5.x). To do so, please go to the backend section Finance. A sample template is being provided.
- Define your bank details for accounts receivable. Customers using payment in advance will be informed about these details. You define these details in the backend section Finance.
- Customize your pricing: As a default setting, you use the pricing (+10%) as Unitedprint. To change this, please change the pricing settings in the backend tool Pricing (in the Marketing section).
- Production: As a default setting, all orders are being forwarded to Unitedprint for production. To change this, please change the production settings in the backend tool Place of Production (in the Production section).
- Please check all pages for accuracy – especially your legal details such as Terms and Conditions, Privacy Policy and your Imprint. You can make changes to these pages in the Text tool (in the CMS section).
Extra
Your USS Partnershop initially only offers so-called offline payment methods (purchase on account, purchase in advance).
In order to also be able to offer your customers online payment methods, you need to register with the payment service provider
Six Payment Services required. This takes place via a separate process.
If you have any questions, please contact the Setup Manager at the following email address: setup@unitedprintshopservices.com
Having completed these 5+1 steps, you can fully focus on promoting your USS Partner Shop.
Marketing (7)
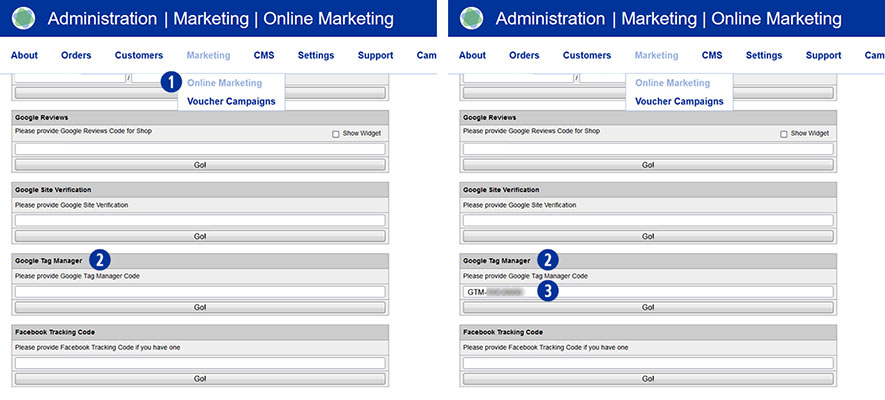
Yes. You can integrate the Google Tag Manager into your Partner
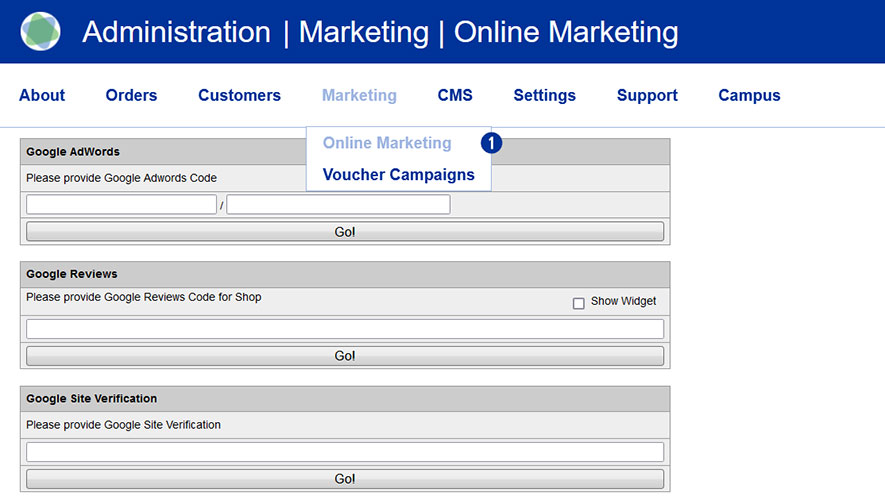
Switch to the Partnershop backend in the menu Marketing / Online Marketing. [1]
Under the module Google Tag Manager [2] , please enter the data you have – Google Tag Manager ID – in the input field. [3]
By clicking the button “Go!” , the ID is saved permanently.
This requires that you have a valid Google account.
Zur Nutzung einiger Google Module wird man aufgefordert, die
To use some Google modules, you will be asked to confirm ownership of your website.
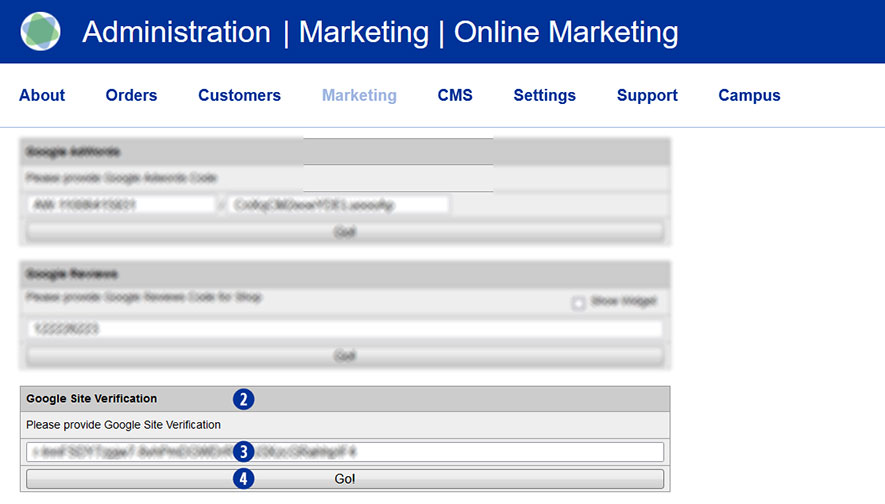
For the Google Site Verification of your Partnershop, you have the option of storing a Google Site Verification Key in the Partnershop backend in the menu Marketing / Online Marketing so that it can be verified by Google.
You can integrate the Google Site Verification code into your Partnershop.
Switch to the Partnershop backend in the menu Marketing / Online Marketing. [1]
Under the module Google Site Verification [2], please enter the verification key (Google Site Verification Code) available to you in the input field. [3]
By clicking on the “Go!” [4] button, the code is saved permanently.
The application of a voucher takes place in the order step “shopping cart”.
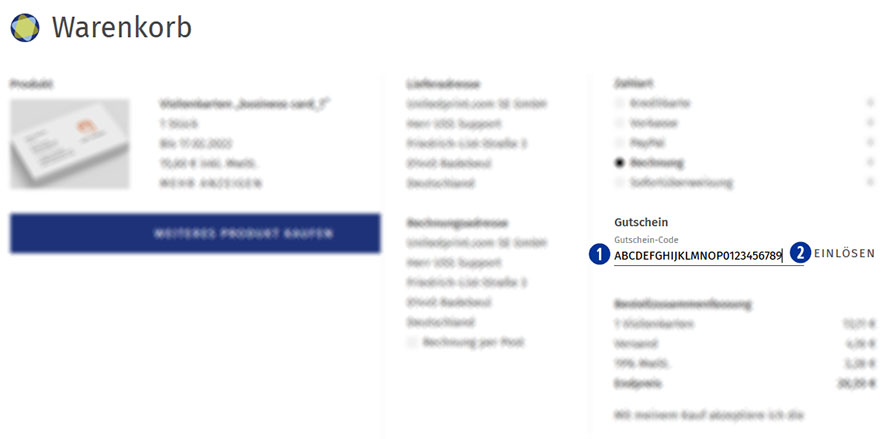
Please enter the coupon code in the input field “Voucher”. [01]
Confirm the entry and use of the voucher by clicking on the button “Redeem voucher”. [02]
An entered coupon code can be removed within the current order before the purchase. To do so, delete the coupon code from the input field “Coupon” and click the button “Redeem coupon”. [02]
A coupon code will not be accepted if the deposited minimum order value is undercut.
A coupon code can only be redeemed once.
Yes. Percentage of customer discounts can be granted.
To set a customer discount, go to the Partnershop backend under Customers. [1] Enter a search criterion (e.g. customer number) in the input mask [2] and then click the button “Go!”. [3]
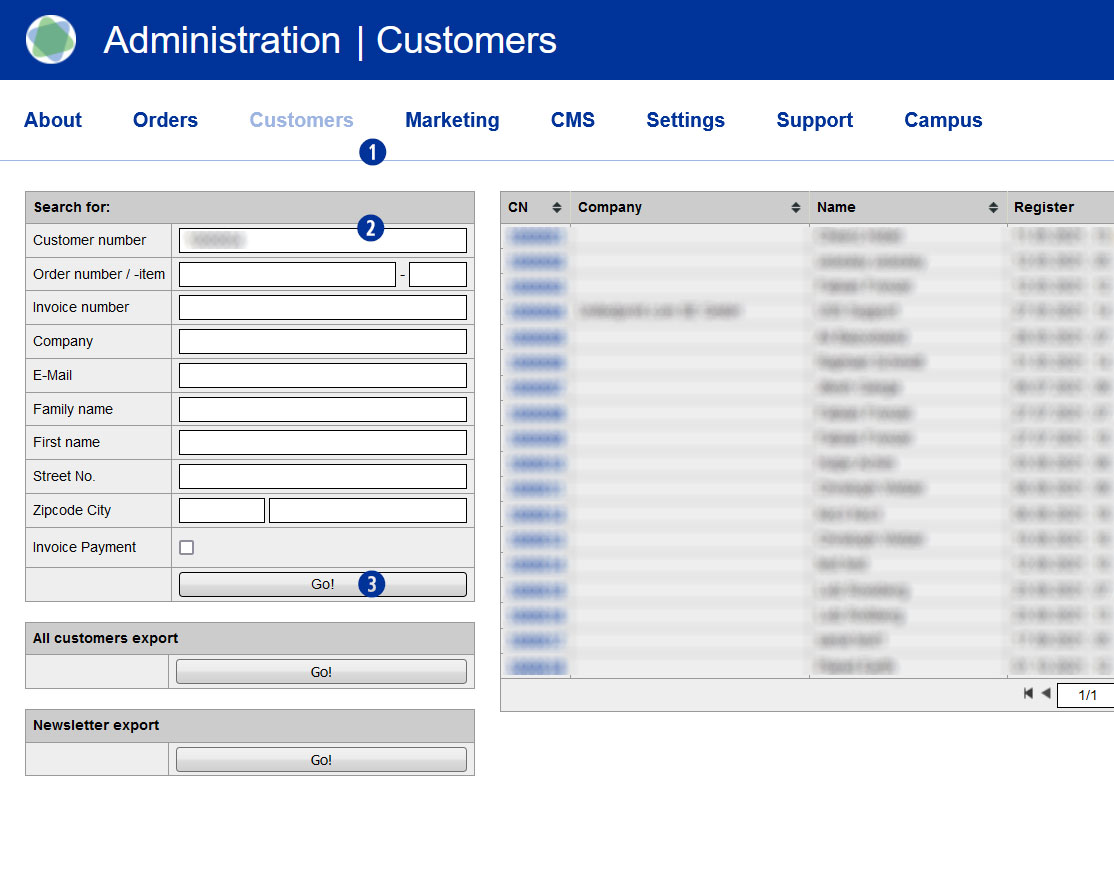
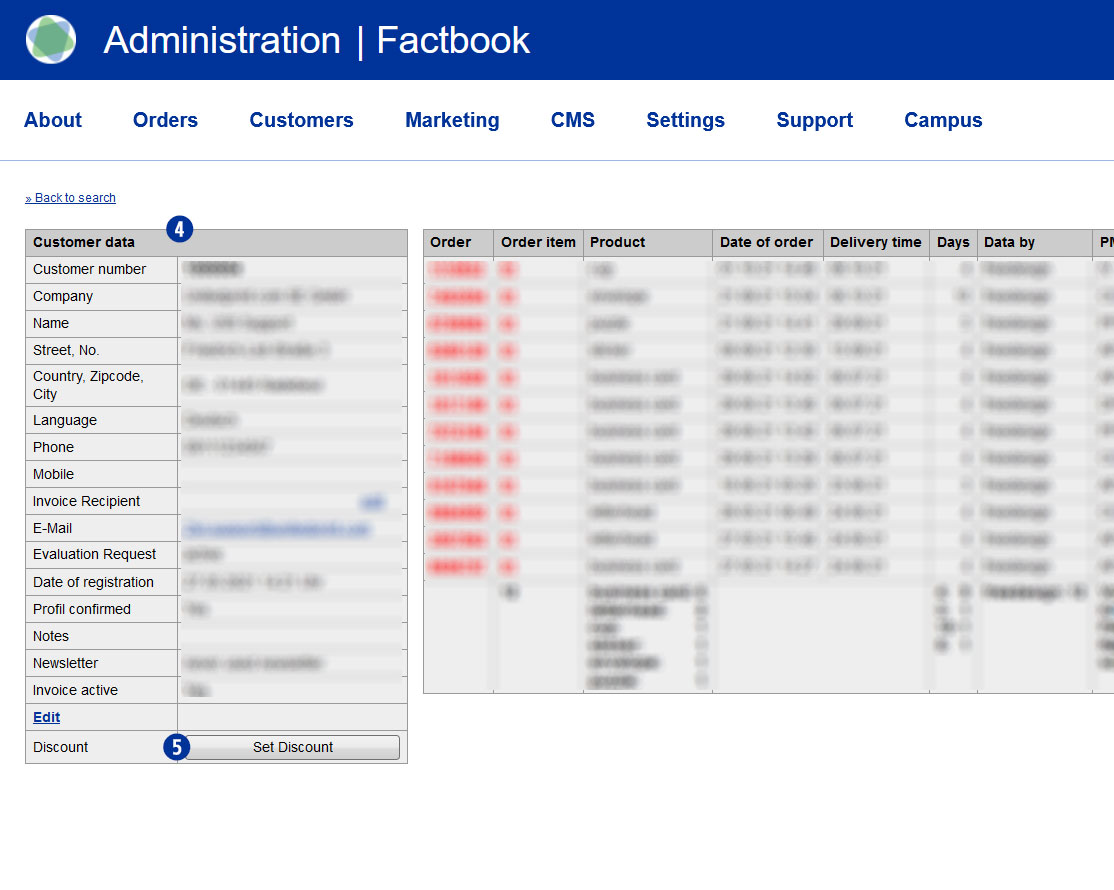
If the search result is successful, the window “Customer data” is displayed. [4]
Click the button “Set Discount” to enter a customer discount. [5]
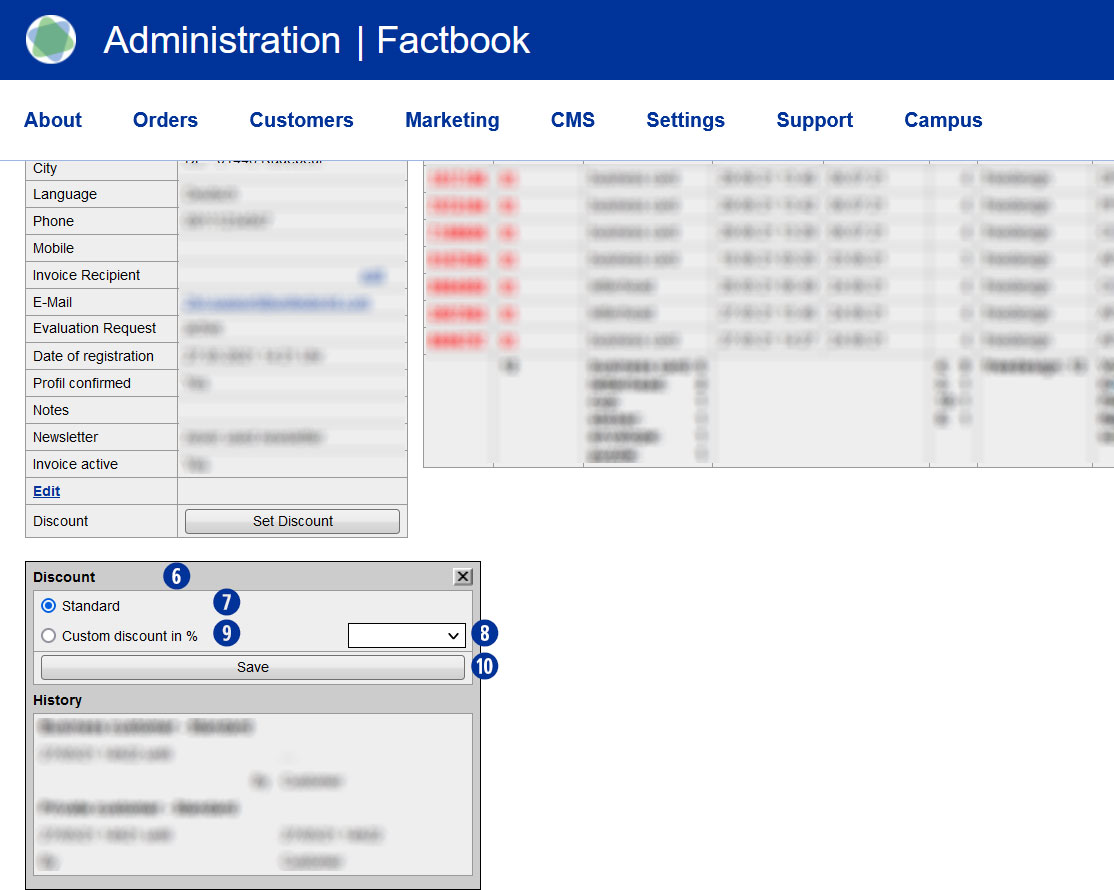
A mask “Discount” will opened. [6] If the customer has not yet deposited a discount, the mask “Discount” opens with the setting “Standard”. [7] Use from the selection list a discount rate between 1 and 100%. [8] The setting changes to “Custom discount in %”. [9] Save your selection by clicking on the button “Save”. [10]
Apart from the reduction in the product price, a deposited discount does not trigger any further actions on the type of shipment and the production period.
Note
A customer registered in the Partnershop (login) receives the discounted price already at the product selection.
If the customer is not yet registered in the Partnershop (login), the discount is displayed in the shopping basket.
In both cases, the discount is shown on the later invoice.
A partner with a discount can be identified in the Partnershop backend at the “SC” (Special Condition) in the “Customer data” window. [4]
No. Unitedprint won’t contact or even communicate directly with your customers. All communication with your customer either takes place automatically via your USS Partner Shop (and hence in your name) or by yourself.
Example 1: Order confirmation
After successfully receiving an order, your USS Partner Shop sends our a confirmation mail to your customer. This mail uses your imprint information and email address.
Example 1: Errors
In case there’s an order-related issue, which cannot be solved through automated emails (e.g. faulty print files), Unitedprint will contact you about it – not your customer.
No. The USS/Unitedprint brand is not openly communicated. Neither in the shop frontend, nor on invoices or shipping labels, etc. All contact points are customized with your brand.
As a default setting, your shop’s URL will have a “…unitedprintshopservices.com” component. In case you want to hide this URL and have your own URL displayed, please contact us.
So you have collected a larger number of business contacts over the time and you wonder what to do with these contact details in order to promote your online print shop? No matter if these contacts are existing client or merely prospective buyers: Contact information is a valuable asset that you should use in order to meet your communication targets (such as the establishment of a local brand or the promotion of your portfolio). In today’s widely digitalized world to send out personalized content to a large number of recipients with just a few clicks, saving you time and money – if you do it all right. The most popular mass communication channel is e-mail Marketing. Software solutions manage your contacts and all they need is your contacts’ names and e-mail addresses. The convenience of this channel allows you to put more effort into the preparation of content (and of course into other Sales/Marketing activities).
In case you lack ideas of when and what to write to your contacts, we would like to provide a little inspiration you with a potential year-round-calendar of potential newsletters.

In addition to such seasonal newsletters, you might want to add special campaigns, e.g. for customers who haven’t ordered for a while (you would select/group these contacts in your newsletter management tool) and are now offered a special discount for returning customers.
No matter what the occasion and the actual content of your newsletter are, you should make sure the recipients of your newsletter become readers. The first thing (and unfortunately rather often the only thing) your audience will see of your newsletter is its subject. Hence, this subject should be as attractive as possible so that the newsletter will not be ignored/deleted immediately. Our advice is to for instance mention your town’s/region’s name and maybe a promised benefit in the newsletter’s subject line (e.g. “Birmingham bar owners now safe 10% on catering supplies”). Apart from price campaigns you might also want to mention your businesses’ special services or print shop’s special features. When creating the actual newsletter, put more effort in an attractive image and write as little text as possible. You don’t want to “waste” your target group’s time but make them visit your web shop as soon as possible. For this reason we advice to integrate a “call to-action” button into your e-mail.
For setting up and realizing your newsletter campaigns we recommend the software tool MailChimp (https://mailchimp.com), which is free of charge for campaigns with less than 5.000 recipients. In addition we recommend tracking your newsletter’s success (conversion rate) by using Google Analytics.
Production (15)
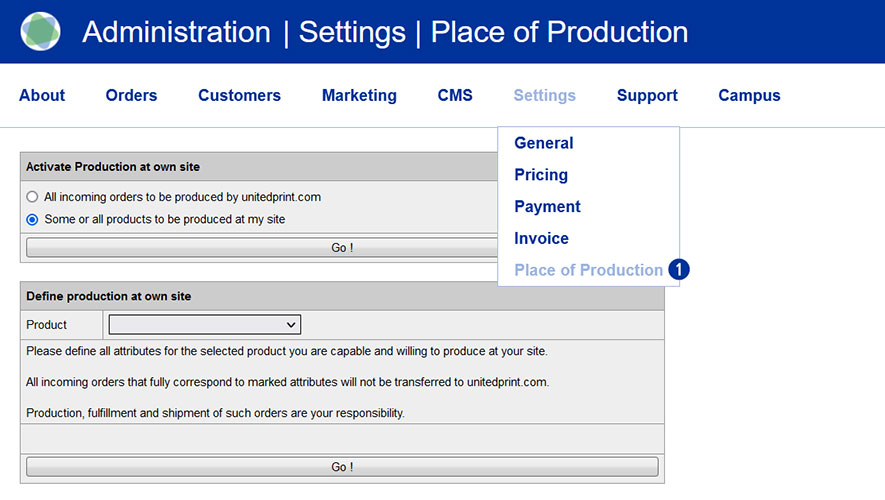
Your USS Partnershop allows you to produce orders for your customers yourself. To make the necessary settings, switch to the menu Settings / Place of Production in the Partnershop backend. [1]
First, activate the radio button „Some or all products to be produced at my side“. [2] Now select the product for which you want to make the settings. [3] Then indicate your production capabilities: Select the product options you are able to provide (e.g. a certain kind of paper or finishing). [4] Confirm your settings by clicking the button “Go!”. [5]
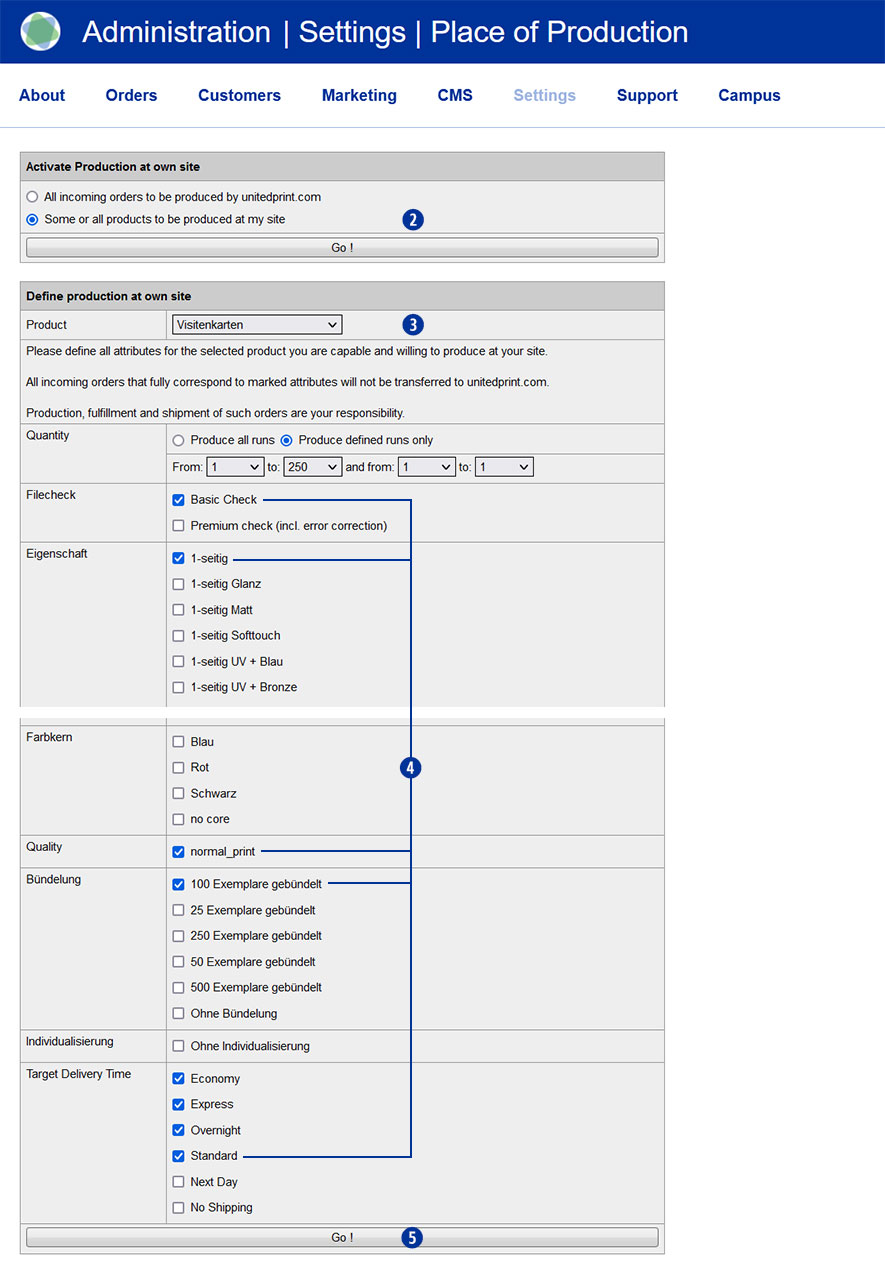
Only when an order item fully fits your individual settings, the order will be classified as an order for your own production.
Attention
Please consider that for every product attribute, at least one option needs to be selected (even when it’s not displayed in the shop frontend) – otherwise, an order item of this product will never be defined as one for your production.
All product options are offered to their customers no matter where they are produced.
In this case, you can accept or reject complaints claims from your customers – without consulting Unitedprint.
Follow these two steps:
- Give your customer a new, reduced invoice.
(Partnershop Backend – menu Orders / Track – select order) - Transfer the difference back to your customers.
If you are complaining about self-produced articles, please consider that the calculation basis for commissions charged to you remains the original selling price.
In general, you can operate your own customer complaints management. Therefore, you can accept or reject complaints claims by the customer – without consulting Unitedprint – even if Unitedprint was the producer of the complained goods.
Follow these three steps:
- Give your customer a new, reduced invoice.
(Partnershop Backend – menu Orders / Track – select order) - Transfer the difference back to your customers.
- Contact Unitedprint if you want to claim the article at Unitedprint.
Please follow these steps:
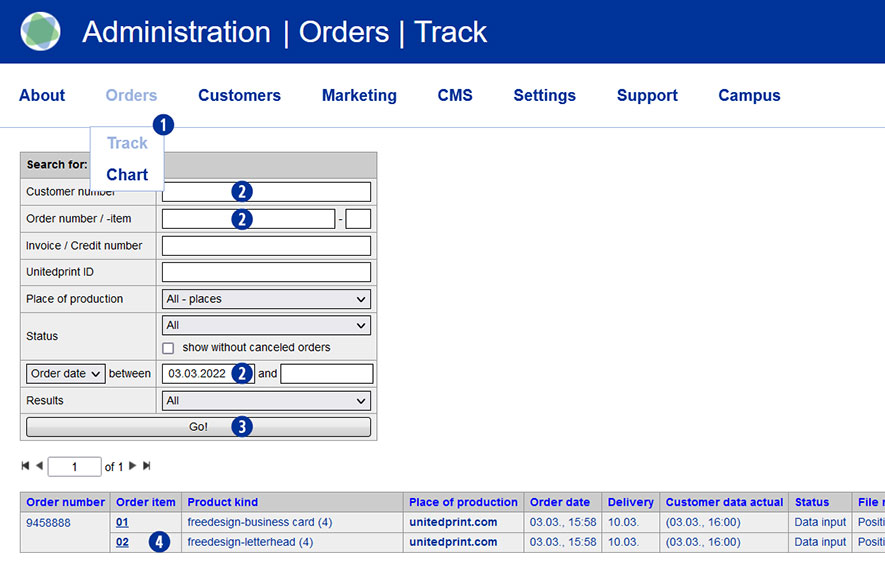
- Switch to the Partnershop backend in the menu under Orders / Track [1] and select the desired order.
- To do this, enter a search criterion [2] and confirm this with the button”Go!”. [3]
- Click on the order item in the column “Order item” [4] that is to be cancelled.
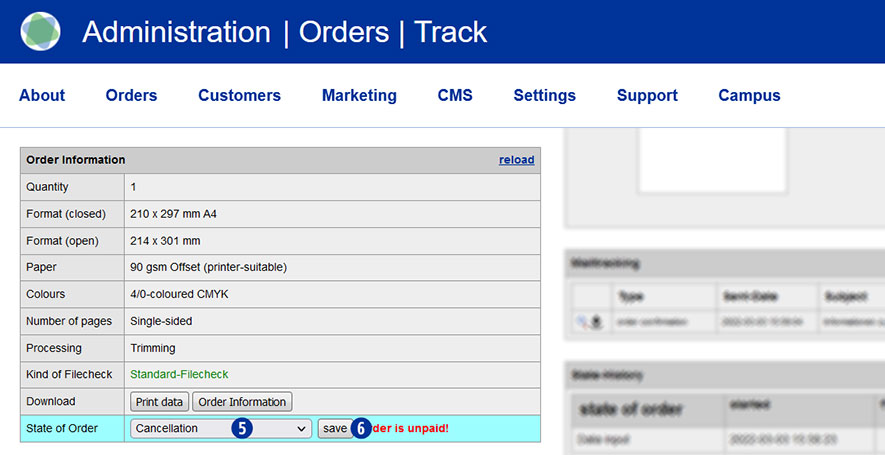
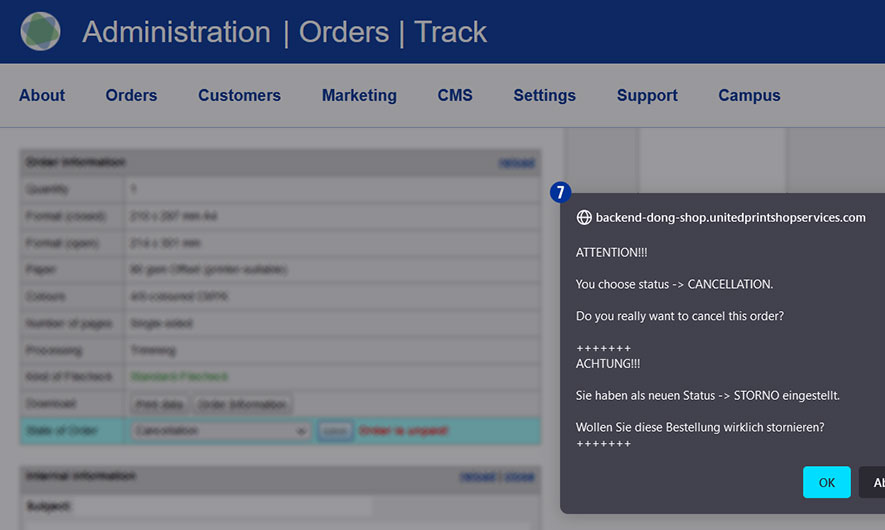
- Within the detail view in the module “Order information” / “State of order”, select “Cancellation” from the dropdown list. [5]
- Confirm your selection with the button “Save”. [6] The following notification message is displayed. [7]
- Have the (partial) chargeback of the payment to your customer.
Note
If an invoice already exists for the order you canceled, you must create a separate cancellation invoice for the purchase order or purchase order item and send it to the customer. The details can be found in the section “How do I create a cancellation invoice?“.
Please follow these steps:
- Switch to the Partnershop backend in the menu under Orders / Track [1] and select the desired order.
- To do this, enter a search criterion [2] and confirm this with the button”Go!”. [3]
- Click on the order item in the column “Order item” [4] that is to be cancelled.
- Within the detail view in the module “Order information” / “State of order”, select “Cancellation” from the dropdown list. [5]
- Confirm your selection with the button “Save”. [6] The following notification message is displayed. [7]
- Have the (partial) chargeback of the payment to your customer.
Note
If an invoice already exists for the order you canceled, you must create a separate cancellation invoice for the purchase order or purchase order item and send it to the customer. The details can be found in the section “How do I create a cancellation invoice?“.
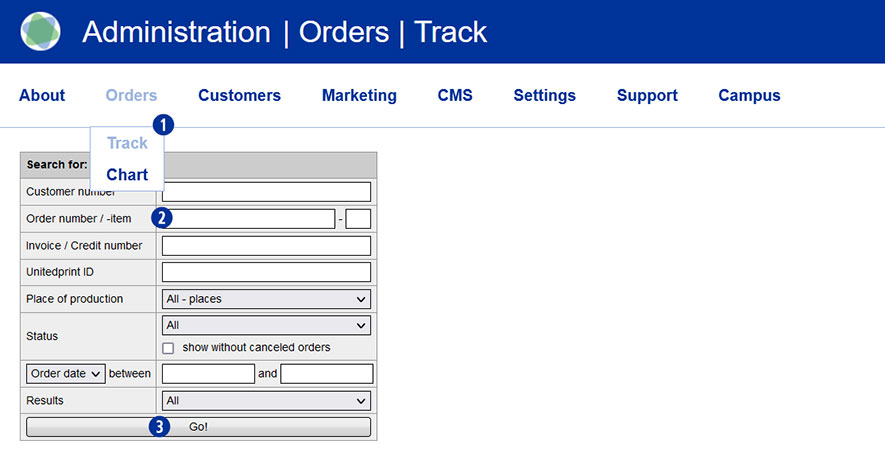
To do this, switch to the Partnershop backend and select Orders / Track in the menu. [1] Enter the desired order number in the field “Order number / -item” [2]. Confirm the search by clicking the button “Go!”. [3]
Note
Search requests for orders that have already been completed must be indicated by specifying the order number or the customer number. A general search for all orders is not possible for technical reasons. If you are looking for the customer number, the search result includes both – current and completed orders.
Yes. We keep you informed about the progress of your order in the form of status messages by e-mail to the address stored in the system.
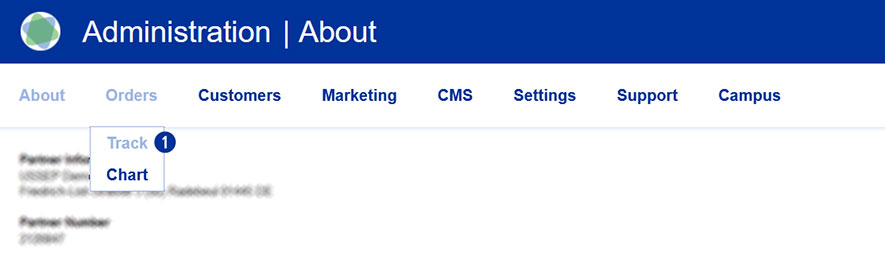
In parallel, you can view the current order status of your orders online at any time. To do this, switch to the Partnershop backend under Orders / Track. [1]
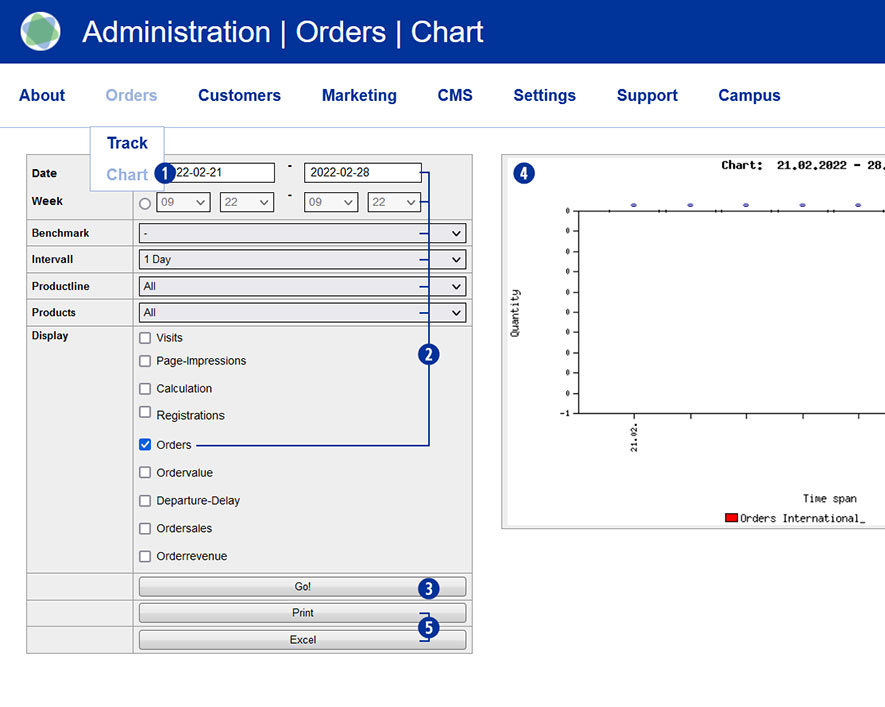
Switch to the Partnershop backend and select Orders / Chart in the menu. [1] Set the desired parameters [2] and start the query by clicking on the “Go!” button. [3] The result of your query is presented to you as a diagram. [4]
In addition, it is possible to print out the query result or export it as an Excel file. [5]
Go to the menu Orders / Track in the Partnershop backend. [1]
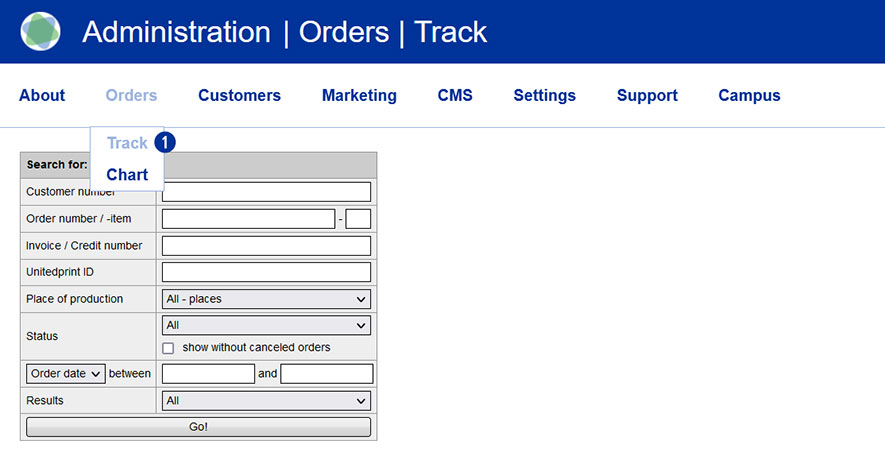
Enter the necessary parameters (for example, order number or order date) into the search mask and start the query. Please review the columns “Order number” and “Product kind” in the order detail view. If there are several items for an order, they are displayed underneath each other for the respective order number under “Product kind”.
Yes. If your customers orders several items with the same product properties, these items can be shipped collectively. For these positions, your shop will offer a shipment voucher.
During the ordering process, your customers have the opportunity to select the option “Combined shimpment”. To do this, select the checkbox “Combined shimpment”. [1]
You can use the function “Copy product” in the shopping cart [2] to create several items of the previously configured item (for example, business cards) and to order these with a corresponding dicoount as a collective shipment. The result is displayed in the calculation overview in the shopping cart. [3]
Alternatively, it is possible to configure the same product once or several times over the calculation page and place it in the shopping cart.
Note
An order with the option “combined shipment” is not triggered to production until the print data has been uploaded to all items.
The delivery date changes for the entire order!
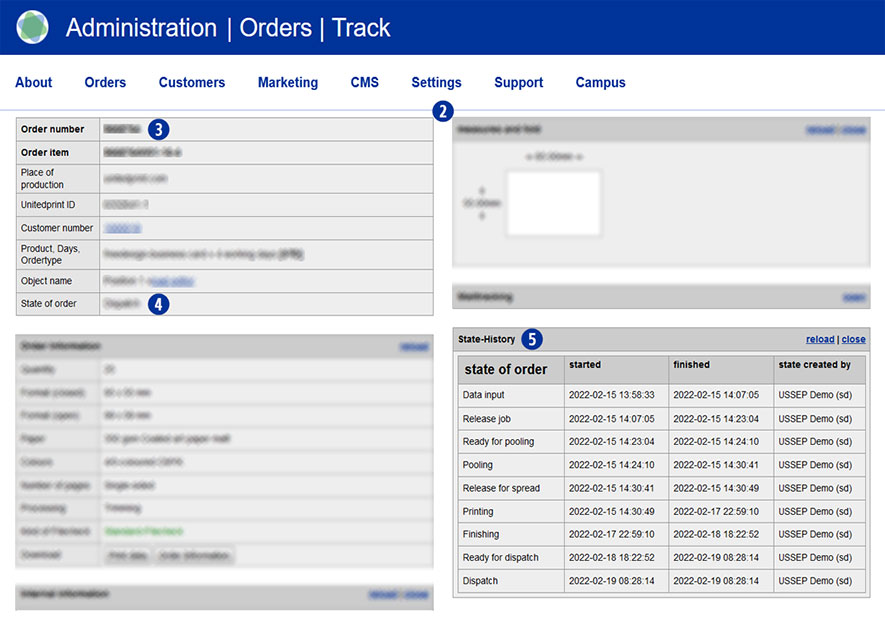
Orders received in the Partnershop go through different statuses, which are displayed in the Partnershop backend.
Switch to the order detail view [2] via the Orders / Track menu. [1]
The current order status can be viewed in the module “Order number” [3] in the field “State of Order” [4]. The status update is automatically done in the background.
The module State-History [5] chronologically lists the completed order statuses for an order.
The order status of an order can provide information if an order from the Partnershop can not be transferred to Unitedprint.
Status: Data Input
Data upload – Print data not uploaded
Payment in advance – receipt of payment not confirmed
Payment – Online Payment has not set Clearance
Status: Waiting for Customize-Release
Data upload – Missing new print data after data check
Status: Waiting for Proof-Release
Release – Proof approval of partner shop customer is pending
The following statuses can be displayed for an order.
| Status | Beschreibung |
| Data input ¹ | Data input |
| Release job ² | Release job |
| File-Check | File-Check |
| Waiting for Customize-Release | Waiting for Customize-Release |
| Customizing | Customizing |
| Waiting for Proof-Release | Waiting for Proof-Release |
| Ready for pooling | Ready for pooling |
| Pooling | Pooling |
| Ready for pre-press stage | Ready for pre-press stage |
| Printing | Printing |
| Self-Production | Self-Production |
| Finishing | Finishing |
| Ready for dispatch | Ready for dispatch |
| Dispatch | Dispatch |
| Cancellation | Cancellation |
Notes
¹ If the payment status “Payment in advance” has been confirmed, the print data has been uploaded but the order status “Data input” is still displayed after approx. 15 minutes, please contact the support.
² If the order status “Release Job” is still displayed after approx. 15 minutes, there is usually a payment problem between you as the Partnershop owner and print24. Please contact the support.
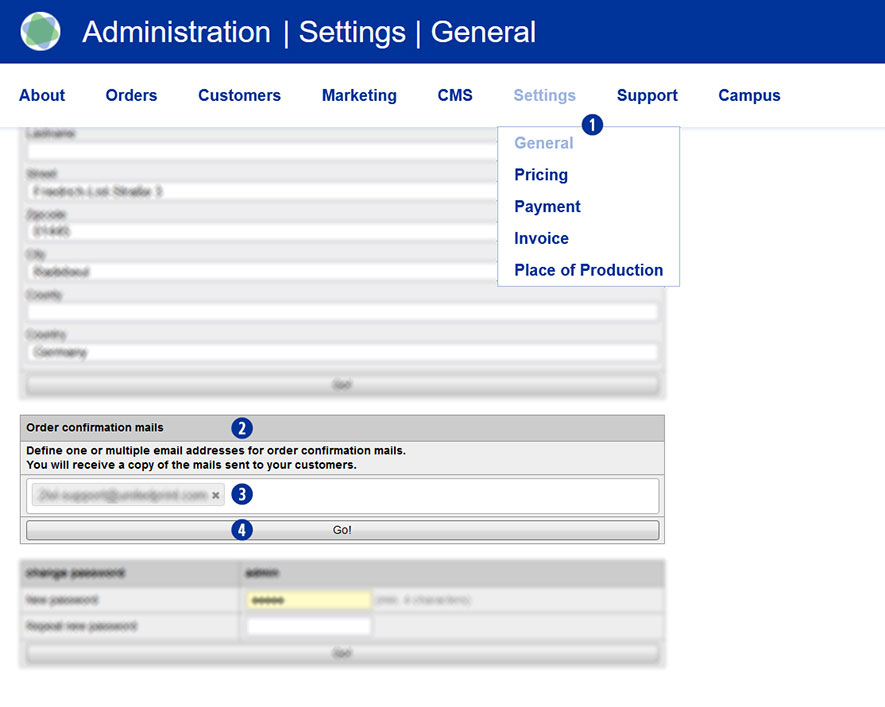
Yes. As a Partnershop owner, you have the option of receiving a copy of the order confirmation for a customer order via your Partnershop by e-mail. For this it is necessary that you deposit a valid e-mail address.
Switch to the Partnershop Backend Settings / General. [1] Enter a valid e-mail address in the input field [3] of the module “Order confirmation mails”.[2] Confirm your entry by clicking on the button “Go!”. [4]
From this time you will receive a copy to the previously stored e-mail address for each customer order via your partner shop.
In parallel, you will receive a second e-mail from Easyprint to you as a partner. The e-mail will be sent within about 30 minutes.
Unless the selected payment method is “payment in advance” you don’t need to do anything. The order will automatically be forwarded to Unitedprint. File checks, production, and shippments to your customers will all be handled by Unitedprint. You can track the status of orders in your backend. As soon as an item was shipped, your USS partner shop sends a shipping confirmation mail to your customer including the invoice document.
All of this happens without any involvement on your side. However, since Unitedprint will never directly contact your customers, you should be available for queries of customers or Unitedprint.
In case the selected payment method of an order is “payment in advance”, you need to check whether you have received the payment and release (mark as “Paid”) the individual order items. Only then the items will be forwarded for production.
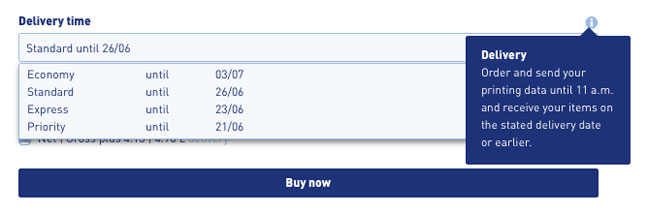
To ensure that an order is delivered at the indicated delivery time, an order must be triggered by 11:00 CET / CEST at the latest and the print data upload must have been completed. This applies if the order is placed on a weekday (Monday-Friday).
For orders which have not been received by this time, the indicated delivery date shifts by + 1 working day.
Please, inform within 15 minutes after completion of order our support team Phone (020-34 99 03 68) / support@easyprint.co.uk.
Otherwise, your trial order needs to be paid. Additionally please cancel your trial order directly into your Partner backend.
For callback please hold ready the United Print ID of each order.
Settings (2)
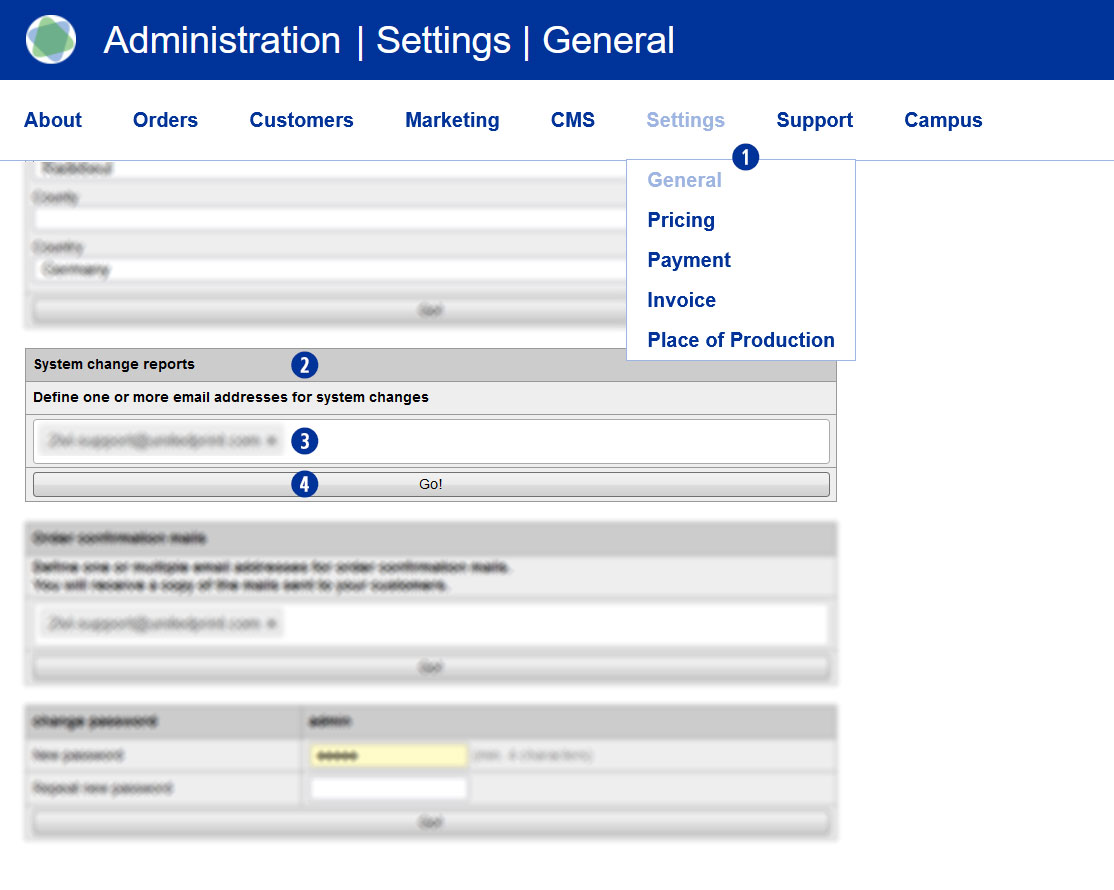
Yes. As a Partnershop operator, you have the option of being informed by e-mail via your partner shop when a voucher or a customer discount has been activated. For this it is necessary that you enter a valid e-mail address.
To do this, switch to the partner shop backend – Settings / General. [1] Enter a valid e-mail address in the input field [3] of the “System change reports”[2] module. Confirm your entry by clicking the “Go!” button. [4]
From this point on, you will receive a notification to the previously stored e-mail address each time a voucher code or customer discount is activated via your Partnershop.
Yes. As a Partnershop owner, you have the option of receiving a copy of the order confirmation for a customer order via your Partnershop by e-mail. For this it is necessary that you deposit a valid e-mail address.
Switch to the Partnershop Backend Settings / General. [1] Enter a valid e-mail address in the input field [3] of the module “Order confirmation mails”.[2] Confirm your entry by clicking on the button “Go!”. [4]
From this time you will receive a copy to the previously stored e-mail address for each customer order via your partner shop.
In parallel, you will receive a second e-mail from Easyprint to you as a partner. The e-mail will be sent within about 30 minutes.